
Crochet and mochi? Two of my utmost joys wrapped into one – well, wouldn’t that be something? So, I got this quirky idea in my noggin and voila! I intertwined the charm of a bunny with the elegance of sakura mochi, and I must say, it was like crocheting a piece of pure serendipity.
Every stitch I put into this pattern was like kneading soft mochi dough, and adding the bunny element? It was the cherry – or should I say sakura blossom – on top! The delicate pink hues mixed with the bunny’s playful features made me feel as if I were in a springtime wonderland.
So, here’s my little challenge to you, dear readers. Dive into this unique crochet journey and let the Bunny Sakura Mochi charm its way into your hands – and hearts. It’s not just a pattern; it’s a delightful fusion of two worlds!
Pattern Designer: Audrey Lc
Materials
- 100% cotton yarn in sport weight
- 2.5 mm crochet hook
- Tapestry needle
- Scissors
- Fiberfill
- 5 mm safety eyes
Abbreviations
Rnd – round
Mr – magic ring
BLO – back loop only
Ch – chain
Sl st – slip stitch
Sc – single crochet
Inc – increase
Dec – decrease
Hdc – half double crochet
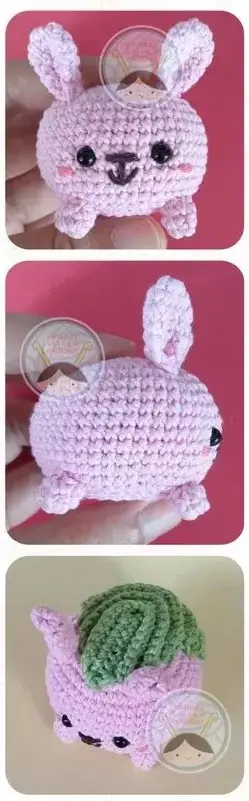
Body
With pink yarn.
Rnd 1: 8 sc in Mr (8)
Rnd 2: 8 inc (16)
Rnd 3: (sc, inc) x 8 (24)
Rnd 4: (sc, inc, sc) x 8 (32)
Rnd 5: (3 sc, inc) x 8 (40)
Rnd 6: (2 sc, inc, 2 sc) x 8 (48)
Rnd 7-15: (9 rounds) 48 sc (48)
Insert safety eyes between rounds 11 and 12, 6 stitches apart.
Rnd 16: (2 sc, dec, 2 sc) x 8 (40)
Rnd 17: (3 sc, dec) x 8 (32)
Start stuffing the body firmly. Continue to stuff until the last rounds.
Rnd 18: (sc, dec, sc) x 8 (24)
Rnd 19: (sc, dec) x 8 (16)
Rnd 20: 8 dec (8)
Fasten off. Weave yarn through the front loops of the last rounds. Pull it tight to close the hole. Weave in yarn end.
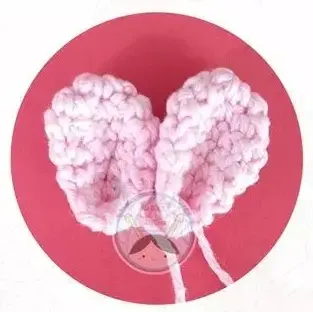
Ears x2
Do not stuff. With pink yarn.
Rnd 1: 6 sc in Mr (6)
Rnd 2: 6 inc (12)
Rnd 3: 12 sc (12)
Rnd 4: (sc, dec, sc) x 3 (9)
Rnd 5: 9 sc (9)
Flatten, make 4 sc through both layers. Fold the ears, make ch 1, then make 2 sl st through both layers. Fasten off, leave a long tail for sewing.
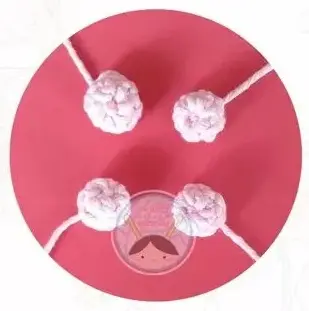
Legs x4
Wit pink yarn.
Rnd 1: 7 sc in Mr (7)
Rnd 2: 7 sc (7)
You can add stuffing a bit.
Fasten off invisibly.
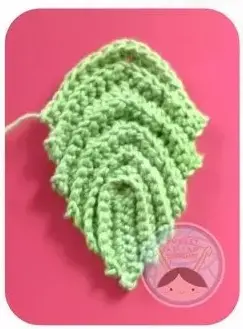
Leaf
With green yarn.
We will work in rows, all rows are worked in BLO.
Make ch 11, start in 2nd chain from the hook.
Row 1: sl st, 8 sc, 3 sc in 1 stitch, on the other side of the chain: 8 sc, sl st, turn (21)
Row 2: BLO skip 2 stitches, sl st, 7 sc, 3 sc in 1 stitch, 7 sc, sl st, turn (19)
Row 3-5: (3 rows) BLO skip 1 stitch, sl st, 7 sc, 3 sc in 1 stitch, 7 sc, sl st, turn (19)
Row 6-7: (2 rows) BLO skip 1 stitch, sl st, 4 sc, 3 hdc, 3 hdc in 1 stitch, 3 hdc, 4 sc, sl st, turn
Row 8-10: (3 rows) ch 2, start in 4th stitch from the hook: BLO sl st, 4 sc, 3 hdc, 3 hdc in 1 stitch, 3 hdc, 4 sc, sl st, turn
Row 11: ch 2, start in 4th stitch from the hook: BLO sl st, 4 sc, 3 hdc, 3 hdc in 1 stitch, 3 hdc, 4 sc, sl st (18)
Fasten off. Leave a long tail for sewing.
Assembly
- Embroider nose between rounds 11 and 12. The nose is 2 stitches wide. We go over the stitches 3 times. Then, embroider vertical line from the center of the nose, over rounds 12 and 13. Next, embroider smile on round 13.
- Embroider cheek blush on the side of each eye between rounds 12 and 13. The cheek blush is 1 stitch wide. We go over the stitch twice.
- Sew the ears over rounds 4 and 5 of the body. The distance between the ears is 8 stitches.
- Sew the front legs over rounds 16 to 17. The front legs are about 7 stitches apart. Then sew the back legs over rounds 15 to 16. The back legs are about 5 stitches apart.
- Sew the leaf on the top of the bunny. The front tip of the leaf is on round 5.
Well, that’s it! I hope you enjoyed making your own Bunny Sakura Mochi as much as I did. This cute little crochet project is perfect for springtime and makes a great addition to any Easter basket or home decor display. And the best part? You can easily customize it with different colors and embellishments to match your personal style.
As we wrap up, let me leave you with this thought: just like how each stitch in this pattern comes together to create a beautiful finished product, every small step we take towards our goals adds up to something greater.
So whether you’re working on a crochet project or pursuing your dreams, remember that progress takes time and effort but the end result is worth it in the end. Keep stitching, keep creating, and never give up on what makes you happy!