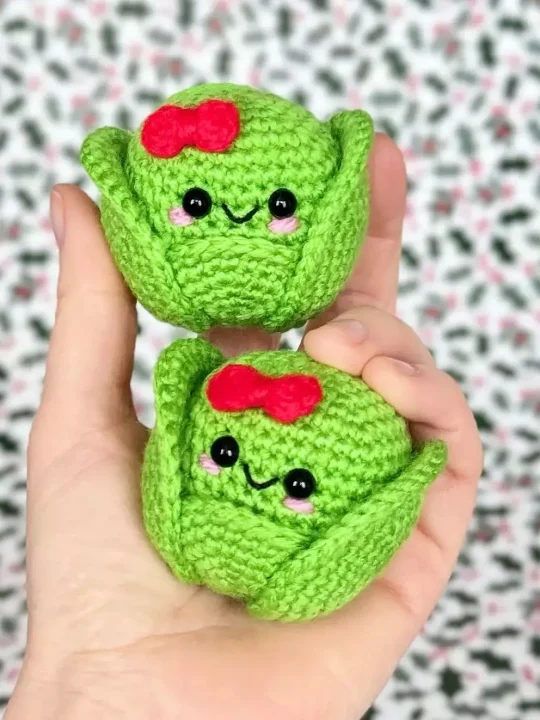
Well, would you look at that – I stumbled upon the most delightful little crochet pattern for brussel sprouts .Talking about whipping up some greens that’ll never go bad on ya! These charming little sprouts, with their cheeky grins, are sure to add pizzazz to any kitchen or dining table.
It’s not just about following a set of instructions . It’s about bringing life into the yarn with every single stitch. I felt a tickle of joy working those tight little rounds, with the vibrant green yarn slipping through my fingers like silk. And when it was time to embroider those gleeful faces, well, I couldn’t help but smile back at my creations.
The pattern itself, now that’s a breeze. It starts with a simple magic ring and involves increasing stitches in a spiral – easy-peasy, right? Then, you get to shape these happy veggies with a bit of stuffing and a quick stitch to flatten out the bottom. Seriously, you won’t believe how these fluffs of yarn transform into pocket-sized bundles of cheer.
Of course, you want your finished project to be as charmingly imperfect as nature itself, so don’t fret if your stitches vary a tad. After all, where’s the character in copy-pasted perfection? Just remember, don’t be shy to swap in different shades of green or to mix it up with the expressions. Every sprout is unique, just like us!
Designer: Hooked on Candy
Materials & Tools
- Yarnsmiths Create DK in colors:
- Bright green, fondant pink, bright red
- 6 mm safety eyes
- 2.5 mm crochet hook
- Yarn needle
- Black embroidery floss
- Fiberfill
Abbreviations
Mr – magic ring
Ch – chain
St – stitch
Sc – single crochet
Dc – double crochet
Inc – increase
Dec – decrease
FLO – front loop only
Sl st – slip stitch
The Sprout
(Using bright green)
Rnd 1: 6 sc in Mr (6)
Rnd 2: inc each st around (12)
Rnd 3: (1 sc, inc) x 6 (18)
Rnd 4: (2 sc, inc) x 6 (24)
Rnd 5: (3 sc, inc) x 6 (30)
Rnd 6: (4 sc, inc) x 6 (36)
Rnd 7-13: sc each st around (36) (7 rounds)
Insert safety eyes between rnds 8-9 three sts apart.
Rnd 14: (4 sc, dec) x 6 (30)
Rnd 15: (3 sc, dec) x 6 (24)
Rnd 16: (2 sc, dec) x 6 (18)
Stuff firmly.
Rnd 17: (1 sc, dec) x 6 (12)
Rnd 18: dec 6 times (6)
Fasten off and leave a long tail. Using a yarn needle weave the long tail through the FLO of the final rounds. Pull tight to close and weave in ends.
Large Leaf x3
(Using bright green)
Rnd 1: 6 sc in Mr (6)
Rnd 2: inc each st around (12)
Rnd 3: (1 sc, inc) x 6 (18)
Rnd 4: (2 sc, inc) x 6 (24)
Rnd 5: (3 sc, inc) x 6 (30)
Rnd 6: (4 sc, inc) x 6 (36)
Rnd 7-8: sc each st around (36) (2 rnds)
Sl st to beg sc to join.
Fasten off and leave a long tail.
Small Leaf
(Using bright green)
Rnd 1: 6 sc in Mr (6)
Rnd 2: inc each st around (12)
Rnd 3: (1 sc, inc) x 6 (18)
Rnd 4: (2 sc, inc) x 6 (24)
Rnd 5-6: sc each st around (24) (2 rnds)
Sl st to beg sc to join. Fasten off and leave a long tail.
Bow
(Using bright red)
Step 1: Leave a long starting tail and complete the following sts into a Mr, ch 2, 2 dc, ch 2, sl st, ch 2, 2 dc, ch 2, sl st (4 ch 2, 4 dc, 2 sl st)
Cut yarn and leave a very long tail.
Step 2: Pull Mr tight, wrap the end tail around the middle, tie both ends together. Leave the remaining tails for assembly.
Assembly
- Use three strands of embroidery floss to add a smile between the eyes.
- Make a stitch under each eye using Fondsnt Pink to create some cheeks.
- Using the long tails, first sew the small leaf to the front and one large leaf to the back. Then sew the last two large leaves either side of your sprout.
- Finally, attach the bow. Weave in any remaining ends.