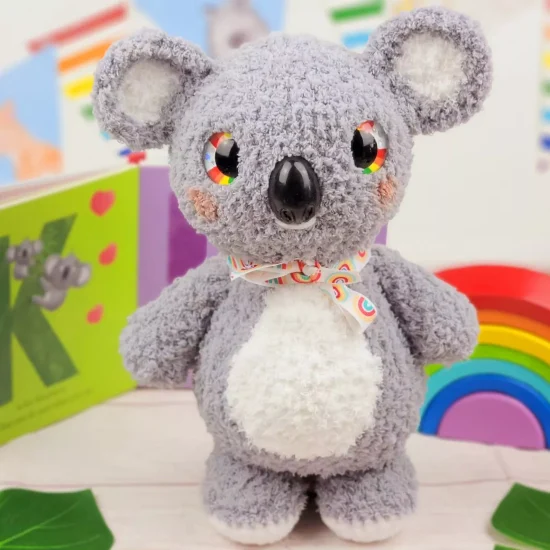
Now, here’s a delightful project I’ve recently fallen head over heels for: the amigurumi koala. Remember those lazy afternoons spent lounging about, sipping on some tea and getting lost in our stitches? Well, this pattern brought back all those memories – and then some.
Crafting this little marsupial pal, with its rounded ears and inquisitive eyes, is like taking a mini-vacation to the Australian outback – minus the sunburn! It’s such a joy when you see it come together, bit by bit. The stitches, the fluff, that cute little nose… Ah! It warms my heart every single time. Plus, there’s just something about cuddling a handcrafted koala that feels, well, heartwarming. Maybe it’s the hours poured into it or perhaps, it’s the childhood tales of adventures Down Under.
So, for those who’ve been craving a project full of charm, nostalgia, and – dare I say it – snuggles, this Amigurumi Koala pattern might just be your perfect match. A cuddly companion for all ages, waiting to be brought to life by your hands.
Pattern Designer: Sweet Oddity Art
Materials
- Yarn: worsted weight #4, approximately 100g of main color and 25g of accent colors
- Color A: Gray, Color B: White, Color C: Pipsqueak yarn
- 3.25 mm crochet hook
- Eyes 18 mm, nose: 26 mm
- Bulky yarn: eyes 30 mm, nose 39 mm
- Scissors
- Sewing needle
- Stitch marker
- Fiberfill
Abbreviations
Mr – magic ring
Ch – chain stitch
Sc – single crochet
Sl st – slip stitch
Dc – double crochet stitch
Inc – increase
Dec – decrease
F/O – fasten off
BLO – bacl loops only
FLO – front loops only
Hdc – half double crochet
Inc3 – 3sc in the same stitch
Notes
- Size: 6 inces from bottom to top of the head.
- Do not join rounds inless stated, work in a continious spiral.
- Use stitch marker to mark the beginning of each round.
- All stitches are worked in both loops unless stated otherwisw in the pattern.
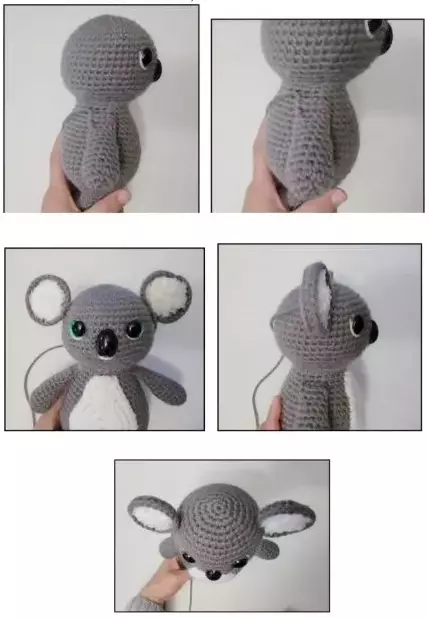
Legs / Body
Starting with color B.
Rnd 1: make 8 sc into a Mr (8)
Rnd 2: increase in each st around (16)
Rnd 3: (sc, inc) x 8 (24)
Rnd 4: BLO sc in each st around
Change to color A.
Rnd 5: sc in each st around
Rnd 6: 2 sc, (dec, sc) x 4, 10 sc (20)
Rnd 7: 2 sc, dec x 4, 10 sc (16)
Rnd 8: 10 sc, dec x 2, 2 sc (14)
Work an additional 9 sc on the 2nd leg. (This is to move the starting point, you may need to minus or add some stitches to adjust for tension).
Do not F/O the 2nd leg.
Rnd 10: ch 4, connect to the 1st leg with a sc, work 13 more sc around the 1st leg, work 4 sc on back of the ch 4, work 14 sc around the 2md leg, work 4 sc on the front of the ch 4 (36)

Rnd 11: (8 sc, inc) x 4 (40)
Rnd 12: sc in each st around
Rnd 13: (9sc, inc) x 4 (44)
Rnd 14: (10 sc, inc) x 4 (48)
Rnd 15-19: sc in each st around
Rnd 20: (dec, 6) x 6 (42)
Rnd 21: sc in each st around
Stuff the body as you work.
Rnd 22: (dec, 19) x 2 (40)
Rnd 23: (dec, 8 sc) x 4 (36)
Rnd 24: (dec, 7 sc) x 4 (32)
Rnd 25: sc in each st around
Rnd 26: (dec, 6 sc) x 4 (28)
Rnd 27-28: sc in each st around
Rnd 29: (dec, 5 sc) x 4 (24)
Rnd 30: sc in each st around
F/O and leave a long tail for sewing.
Head
With color A.
Rnd 1: make 6 sc in Mr (6)
Rnd 2: increase in each st around (12)
Rnd 3: (sc, inc) x 6 (18)
Rnd 4: sc, inc, (2 sc, inc) x 5, sc (24)
Rnd 5: (3 sc, inc) x 6 (30)
Rnd 6: 2 sc, inc, (4 sc, inc) x 5, 2 sc (36)
Rnd 7: (5 sc, inc) x 6 (42)
Rnd 8: 3 sc, inc, (6 sc, inc) x 5, 3 sc (48)
Rnd 9-15: sc in each st around
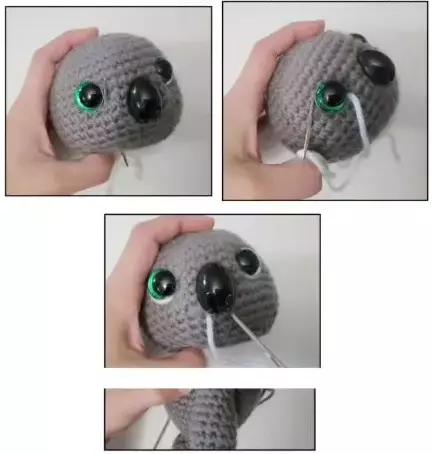
For worsted and bulky version: place eyes between rounds 11 and 12, leaving 10 holes apart.
For worsted: place the nose between rounds 13 and 14, between the eyes.
For bulky: place the nose in between rounds 15 and 16, in between the eyes.
Rnd 16: 3 sc, dec, (6 sc, dec) x 5, 3 sc (42)
Rnd 17: sc in each st around
Rnd 18: (5 sc, dec) x 6 (36)
Rnd 19: 2 scm dec, (4 sc, dec) x 5, 2 sc (30)
Rnd 20: (3 sc, dec) x 6 (24)
F/O.
Arms x2
With color A:
Rnd 1: work 6 sc into a magic ring (6)
Rnd 2: increase in each st around (12)
Rnd 3: (5 sc, inc) x 2 (14)
Rnd 4: sc in each st around
Rnd 5: (5 scm dec) x 2 (12)
Start stuffing the arms.
Rnd 6-7: sc in each st around
Rnd 8: (4 scm dec) x 2 (10)
Stop stuffing the arms.
Rnd 9-10: sc in each st around.
Rnd 11: (3 sc, dec) x 2 (8)
Rnd 12-13: sc in each st around
Fold the arms in half and sc the opening closed. F/O and leave a ling tail for sewing.
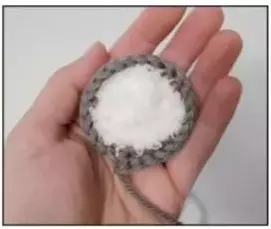
Belly
With color B.
Rnd 1: make 12 sc into a Mr (12)
Rnd 2: increase in each st around (24)
Rnd 3: (3 sc, inc) x 6 (30)
Rnd 4: (4 sc, inc) x 6 (36)
Rnd 5: ch 1, turn, work 5 sc across
Rnd 6: ch 1, turn, work 6 sc across
Rnd 7: ch 1, turn, dec, 2 sc, dec (4)
Rnd 8: ch 1, turn, work 4 sc across sc around the edge of the belly
F/O and leave a long tail for sewing.
Ears x2
Starting with color C.
Rnd 1: make 6 sc into a Mr (6)
Rnd 2: increase in each st around (12)
Rnd 3: (inc x 3, 3 sc) x 2 (18)
Do not F/O the color A eats.
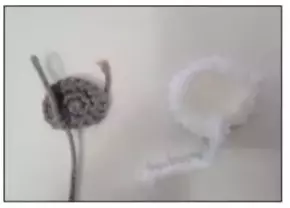
Place the back sides of both ears together.
Rnd 4: ((sc, inc) x 3, 3 sc) x 2 (24)
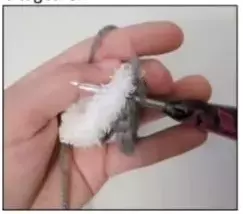
Rnd 5: BLO sc in each st around
F/O and leave a long tail for sewing.
Alternate Nose
Ch 7.
Rnd 1: sc in 2nd chain from hook, 4 sc, inc in last chain, working on opposite side of chain: 5 sc, inc (14)
Rnd 2: inc, 4 sc, inc x 3, 4 sc, inc x 2 (20)
Rnd 3: inc, 6 sc, inc x 4, 6 sc, inc x 3 (28)
Rnd 4-5: sc in each st around
F/O and leave a long tail for sewing.
Assembly
Head / Body
- Thread your needle with a ling strand of white yarn. Insert the needle inside the opening of the head. Bring the needle up to the lower corner of the eye. Wrap the yarn around the outside of the eye. Insert the needle into a hole on the top of the eye. Pull a little tight to create a highligt.
- Thread your yarn with a long strand of white yarn. Embroider a little mouth underneath the nose.
- Sew the head and body together. You may need to add more stuffing as you sew.
Belly
- Pin the belly to the front of the body.
- Sew the belly onto the body.
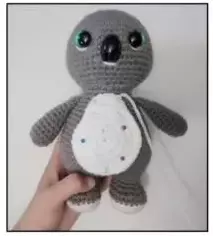
Ears
- Pin the eats onto the side of the head.
- sew the eats onto te head.
Arms
- Pin the arms onto the side of the body approximately between rounds 19 and 20.
- Sew the arms onto the body.