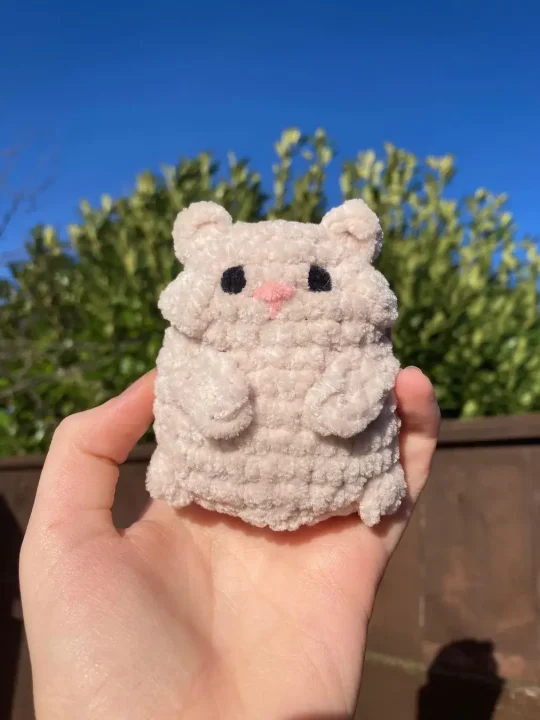
Oh, have I stumbled upon a true gem for all you craft enthusiasts out there! It’s none other than the adorable Hazel the Hamster amigurumi pattern. And guess what? It’s a no-sew project! That’s right, you heard me. For folks like us who love to dive headfirst into crocheting without pausing for tedious sewing sessions, this pattern is a blissful escape . The simplicity of it, combined with the cuteness overload of Hazel, has me all excited to share this find with you.
Now, let’s chat about what makes this particular pattern a stand-out. First off, the simplicity is just unparalleled. Whether you’re a newbie who’s just dipping your toes into the vast ocean of crocheting or an old hand at the craft, this pattern is sure to tickle your fancy. The joy of watching Hazel come to life, loop by loop, without having to sew parts together is… well, it’s simply delightful!
And the end result? A squishy, cuddly companion that seems to hop right out of a storybook. Do give Hazel the Hamster a whirl, and trust me, it’ll add a dash of charm to your crochet menagerie. The sense of accomplishment when you finally hold Hazel in your palms is purely heartwarming. Ah, the wonders of crafting, right?
Designer: C.A.T Crochets
Materials & Tools
- Chunky yarn (Flutterby chunky)
- 5.0 mm crochet hook
- Stuffing
- Scissors
- Darning needle
- Safety eyes
Abbreviations
Mr – magic ring
Sc – single crochet
Inc – increase
Dec – decrease
Bob – bobble stitch
FLO – front loop only
Sl st – slip stitch

Head & Body
Rnd 1: 6 sc in Mr (6)
Rnd 2: (1 inc) x 6 (12)
Rnd 3: (sc, inc) x 6 (18)
Rnd 4: sc around (18)
Insert safety eyes on rnd 4, 3 stitches apart.
Rnd 5: 6 sc, Bob, 5 sc, Bob, 5 sc (18)
Rnd 6: sc around (18)
Rnd 7: FLO (2 sc, 1 inc) x 6 (24)
Rnd 8-11: sc around for 4 rounds
Rnd 12: 9 sc, Bob, 7 sc, Bob, 6 sc (24)
Rnd 13: (2 sc, dec) x 6 (18)
Start stuffing.
Rnd 14: (sc, dec) x 6 (12)
FInish stuffing.
Rnd 15: dec around and fasten off (6)
Ears x2
Rnd 1: 4 sc in Mr (4)
Close with sl st, fasten off and leave a tail for sewing.
Repeat for the second ear.
Hands x2
Rnd 1: chain 3
Rnd 2: starting in the second stitch from your hook, 2 sc
Fasten off and leave a tail for sewing. Repeat for the second hand.
Assembly
- Sew the ears on to the top of the head.
- The ears should sit across rows 2 and 3. They should also sit 1 stitch from the outside of the cheeks.
- Sew the hands across rows 7 and 9 on a slight angle.
- The start of row 1 of the hands is in line with the inside of the chees, and the end of row 2 of the hands is in line with the middle of the cheeks.
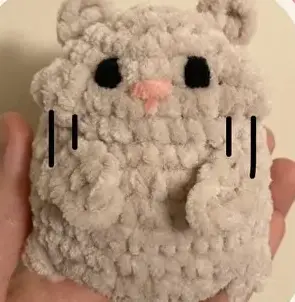
- (If you used safety eyes, skip this step) sew 2 little eyes on row 4 between the cheeks. These should be 3 stitches apart.
- Then add a little nose between the eyes with a horizontal stitch between row 4 and 5 and a vertical stitch in the centre of the horizontal one on row 5.