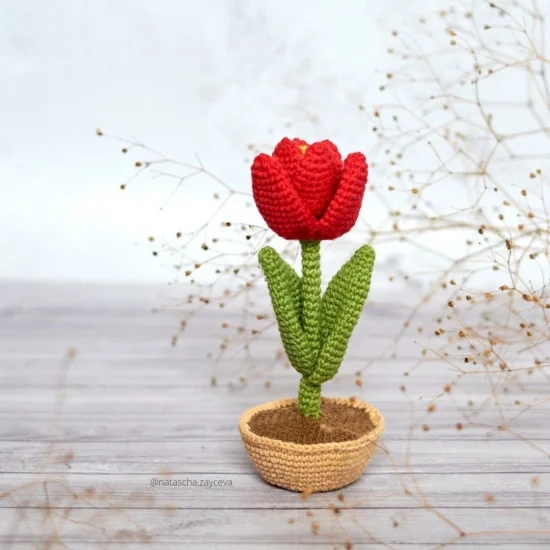
Today, I want to introduce you to a crochet pattern that will bring joy and vitality into your home. It’s the perfect project for those who are looking for something simple yet stunningly beautiful.
And what is it? A Tulip in a Pot Crochet Pattern!
This pattern is so easy to follow that even if you’re new to crocheting, you’ll be able to create an amazing piece of art in no time. The best part is that you can make as many tulips as you like – in different colors or sizes – and place them anywhere around your house.
Whether on windowsills, tabletops or bookshelves, these charming little flowers will add vibrancy and elegance wherever they go. So let’s get started with this fun and fulfilling project!
Pattern designer: Natascha Zayceva
Materials
- Yarn sport weight/4 ply yarn Yarnart Jeans
- Red 90
- Green 69
- Beige 07
- Brown 40
- Yellow 35
- Crochet hook 1.6 mm
- Stuffong for the pot
- Poly pellets granules or any weighting
- The wire, transparent glue (for stem – piece of wire 30cm long, diameter 1.5-2 mm
- Scissor, needle, markers
Abbreviations
Mr – magic ring
Ch – chain
Sl st – slip stitch
Sc – single crochet
Inc – increase
Dec – decrease
BLO – back loop only
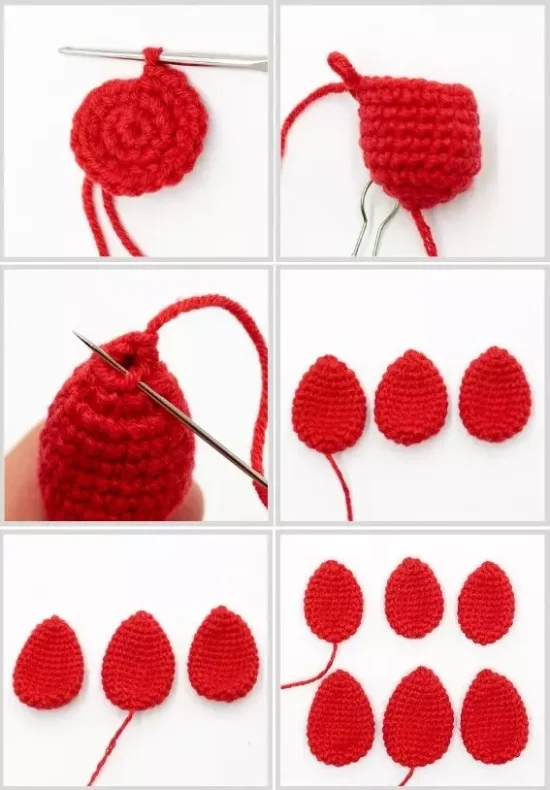
Petals
Leave the yarn end for sewing pieces at one small and one large petal, somewhere after round 3 bring it to the front side. Do not stuff.
3 Inner (Small) Petals
Rnd 1: 1r. 6 sc in MR (6)
Rnd 2: inc * 6 (12)
Rnd 3: (sc, inc) * 6 (18)
Rnd 4-8: 5 rounds of 18 sc (18)
Rnd 9: (4 sc, dec) * 3 (15)
Rnd 10: 15 sc (15)
Rnd 11: (3 sc, dec) * 3 (12)
Rnd 12: dec * 6 (6)
Tighten the hole through front loops , fasten off, weave in the ends.
3 Outer (Large) Petals
Rnd 1: 7 sc in MR (7)
Rnd 2: inc * 7 (14)
Rnd 3: (sc, inc) * 7 (21)
Rnd 4-9: 6 rounds of 21 sc (21)
Rnd 10: (5 sc, dec) * 3 (18)
Rnd 11: 18 sc (18)
Rnd 12: (4 sc, dec) * 3 (15)
Rnd 13: 15 sc (15)
Rnd 14: (3 sc, dec) * 3 (12)
Rnd 15: dec * 6 (6)
Tighten the hole, fasten off, weave in the ends.
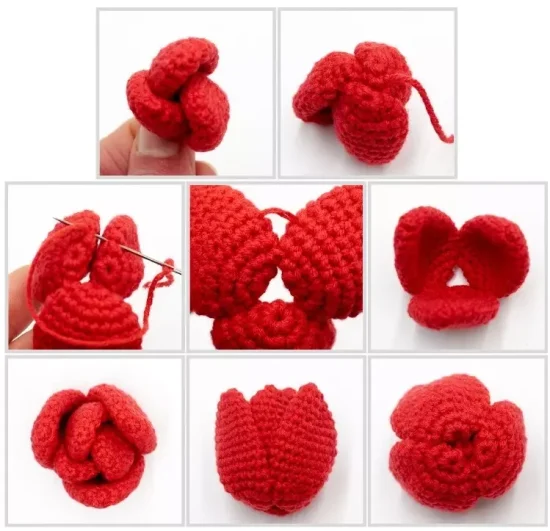
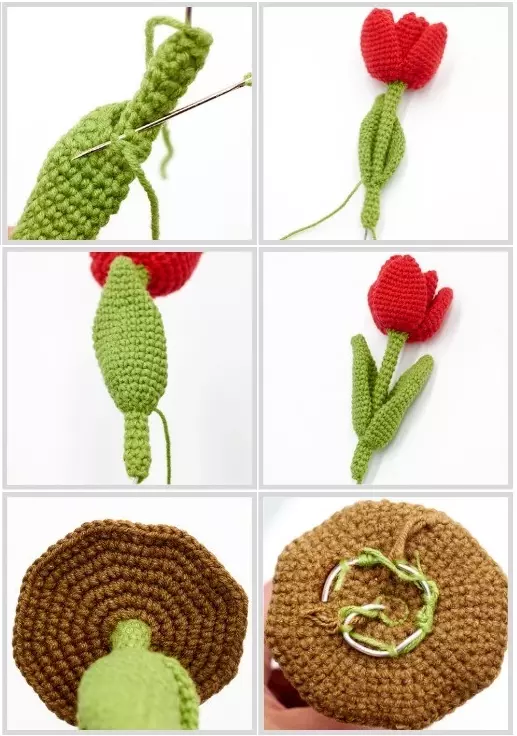
Bud
Fold the small petals into a “rose” and sew them up on the bottom (photos 1-2).
Sew the large petals together on the sides after rounds 2 and 4 (photos 3-5).
Insert the inner petals so that they are located between the outer petals with a wide part. Sew them together. Photos 6-8.
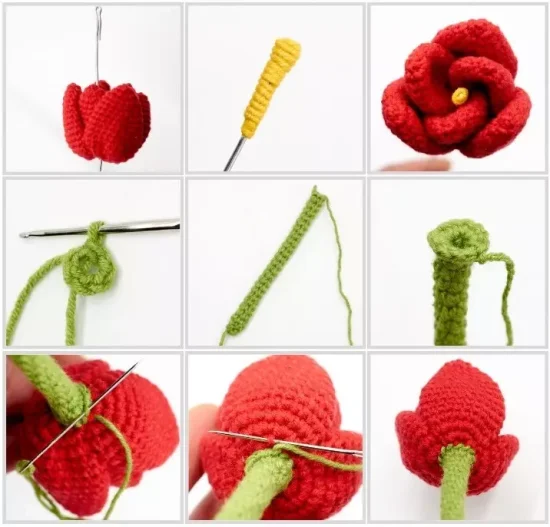
Stem
Prepare a wire about 30 cm long (if you plan to make a stem longer, take a larger piece of wire). Insert the wire in the center of the petals and bend the end from the side of the bud (photo 1). Smear it with glue and wrap it with yellow thread (photo 2) – this will be our pistil.
Crochet in spiral rounds the stem of the desired length, adjust the length with the number of rounds. I have 9 cm long.
Do not stuff.
Leave the yarn tail for sewing.
Rnd 1: ch6, close in a circle with sl st (photo 4)
Rnd 2-37: 36 rounds of 6 sc (6) – photo 5
Rnd 38: inc * 6 (12), sl st – photo 6
Leave the yarn tail for sewing.
Sew to round 1 of the petals through front loops of the last round of the stem (photos 7-9).
Leaves
Large Leaf
Rnd 1: 6 sc in Mr (6)
Rnd 2: 6 sc (6)
Rnd 3: (1 sc, inc) * 3 (9)
Rnd 4: 9 sc (9)
Rnd 5: (2 sc, inc) * 3 (12)
Rnd 6: 12 sc (12)
Rnd 7: (3 sc, inc) * 3 (15)
Rnd 8-9: 2 rounds of 15 sc (15)
Rnd 10: (4 sc,, inc) * 3 (18)
Rnd 11-12: 2 rounds of 18 sc (18)
Rnd 13: (5 sc, inc) * 3 (21)
Rnd 14-15: 2 rounds of 21 sc (21)
Rnd 16: (6 sc, inc) * 3 (24)
Rnd 17-19: 3 rounds of 24 sc (24)
Rnd 20: (6 sc, dec) * 3 (21)
Rnd 21: (5 sc, dec) * 3 (18)
Fold the piece in half and crochet 8-9 sc through both sides.
Leave the yarn tail for sewing.

Small Leaf
Rnd 1: 6 sc in Mr (6)
Rnd 2: 6 sc (6)
Rnd 3: (sc, inc) * 3 (9)
Rnd 4: 9 sc (9)
Rnd 5: (2 sc, inc) * 3 (12)
Rnd 6: 12 sc (12)
Rnd 7: (3 sc, inc) * 3 (15)
Rnd 8: 15 sc (15)
Rnd 9: (4 sc, inc) * 3 (15)
Rnd 10: 18 sc (18)
Rnd 11: (5 sc, inc) * 3 (21)
Rnd 12-13: 2 rounds of 21 sc (21)
Rnd 14: (6 sc, inc) * 3 (24)
Rnd 15-17: 3 rounds if 24 sc (24)
Rnd 18: (6 sc, dec) * 3 (21)
Rnd 19: (5 sc, dec) * 3 (18)
Fold the piece in half and crochet 8-9 sc through both sides.
Leave the yarn tail for sewing.
Soil
Rnd 1: 8 sc in MR (8)
Rnd 2: inc * 8 (16)
Rnd 3: (sc, inc) * 8 (24)
Rnd 4: (2 sc, inc) * 8 (32)
Rnd 5: (3 sc, inc) * 8 (40)
Rnd 6: (4 sc, inc) * 8 (48)
Rnd 7: (5 sc, inc) * 8 (56)
Rnd 8: (6 sc, inc) * 8 (64), sl st
Cut the yarn, fasten off. Photo 1.
Sew on the leaves. Sew the small leaf between rounds 7 or 8 of the stem in a circle, through the stitches of the last row (photo 2) and, on the contrary, sew the larger leaf one round below. Sew in through the stitches of the last row also. Photos 3-5.
Sew on the stem. Pass the second end of the wire through the center of the soil and sew the stem to the soil after round 1 (photo 6). Twist the remaining wire end in a spiral and sew it to the soil from the inside (photo 7).
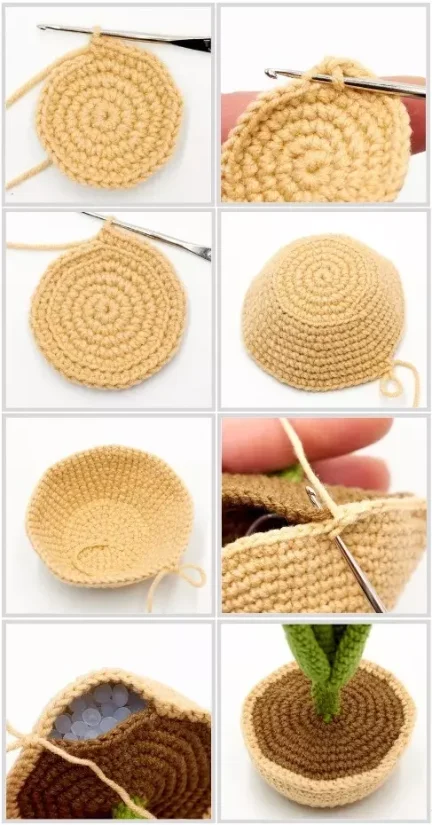
Pot
Rnd 1: 8 sc in MR (8)
Rnd 2: inc * 8 (16)
Rnd 3: (inc, sc) * 8 (24)
Rnd 4: (2 sc, inc) * 8 (32)
Rnd 5: (3 sc, inc) * 8 (40) – photo 1
Rnd 6: BLO 40 sc (40) – photos 2-3
Rnd 7: 40 sc (40)
Rnd 8: (4 sc, inc) * 8 (48)
Rnd 9: 48 sc (48)
Rnd 10: (5 sc, inc) * 8 (56)
Rnd 11: 56 sc (56)
Rnd 12: (6 sc, inc) * 8 (64)
Rnd 13: 64 sc (64) – photos 4-5
Rnd 14: 64 sc with the soil (photo 6) (64), sl st
Before closing the hole, add a weighting (pooly pellets granules, pebbles, grains) for stability (photo 7).
Cut the yarn, fasten off, weave in the ends.
So there you have it, crocheting a tulip in a pot is not only easy but also makes for beautiful home decor! You can use these adorable flowers to add some color and texture to any room in your house. Place them on your coffee table or window sill for an instant pop of springtime joy.
One of my favorite ways to incorporate crochet tulips into my home decor is by making a bunch of them in different colors and sizes and placing them all together in one large vase. It creates such a lovely centerpiece that never fails to impress guests. Plus, since they’re made from yarn, they’ll last way longer than real flowers!
So why not give this free pattern a try? Trust me, once you make one, you won’t be able to stop!