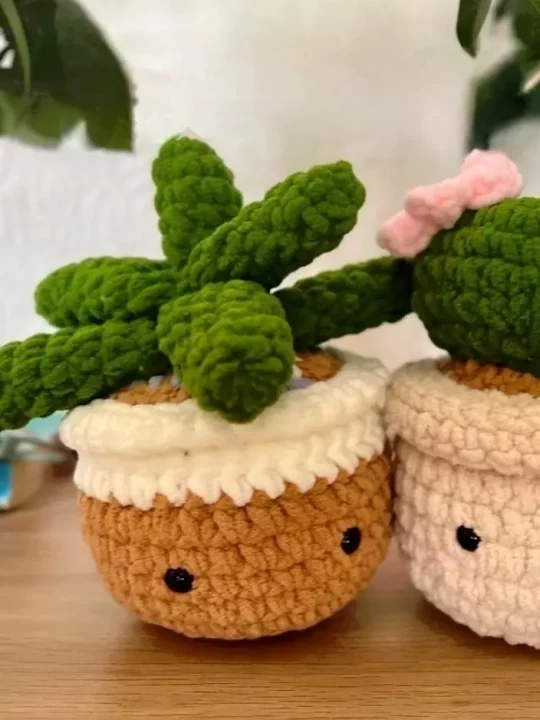
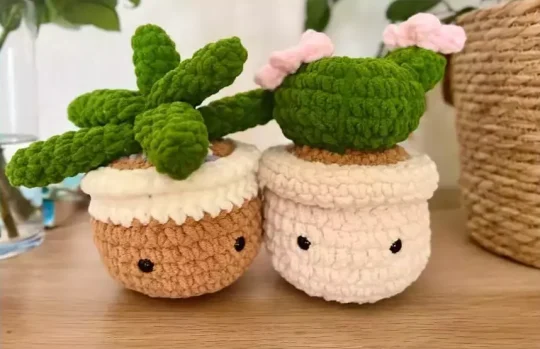
Oh, honey, if you’ve got a love for greenery but a bit of a black thumb, have I got the cure for you! Picture this: a darling little crochet cactus plant nestled in its own cozy pot, and – wait for it – another version with the cutest pink flowers blooming on top.
Here’s the skinny on this project: it’s like getting two patterns in one! You’ll be crocheting in the round, doing some simple increases and decreases – child’s play for someone like you, I bet. Oh, and those flowers?
A little color change and voila – you got yourself a cactus that’s in perpetual bloom. How fabulous is that? Don’t worry about pricking your fingers; this desert darling is as soft as a skein just waiting to be stitched.
So, give it a whirl, why don’tcha? Whether you’re jazzing up your desk or gifting it to a friend who needs a dash of cheer, these cacti are sure to be a conversation starter. And between you and me, having a little green buddy that doesn’t wilt is quite the relief – we can’t all have that perfect green thumb, am I right?
But shh, that’ll be our secret. Happy crocheting!
Designer: Blue Beena
Materials & Tools
- Yarn (Snuggly chenille plushy yarn)
- Colors: green (plant), beige (pot), brown (ground), white and pink (flowers)
- Stuffing
- Safety eyes
- Yarn needle
Abbreviations
Mr – magic ring
St – stitch
Sc – single crochet
Inc – increase
Dec – decrease
Sl st – slip stitch
Dc – double crochet
Hdc – half double crochet
BLO – back loop only
FLO – front loop only
Pot
Start in beige.
Rnd 1: 7 sc in Mr
Rnd 2: inc around (14)
Rnd 3: (sc, inc) x 7 (21)
Rnd 4: (2 sc, inc) x 7 (28)
Rnd 5: (3 sc, inc) x 7 (35)
Rnd 6: BLO: sc around (35)
Rnd 7-9: sc around (35)
Rnd 10: FLO: sc around (35)
Rnd 11-12: sc around (35)
Insert safety eyes between R 8/9, 6 stitches apart
Sl st F.O. and weave the end.
Change to brown.
Rnd 13: insert the hook in BLO of R 10 and sc around
Rnd 14: (3 sc, dec) x 7 (28)
Rnd 15: (2 sc, dec) x 7 (21)
Stuff firmly.
Rnd 16: (sc, dec) x 7 (14)
Rnd 17: dec around
Add some more stuffing if needed.
Sl st F.O. and sew close.
(To make a 2 colors Pot switch to the contrast color after R8 to R12)
Plant (1 ver)
Cactus (green)
Rnd 1: 6 sc in Mr
Rnd 2: inc around (12)
Rnd 3: (sc, inc) x 6 (18)
Rnd 4: (2 sc, inc) x 6 (24)
Rnd 5: (3 sc, inc) x 6 (30)
Rnd 6: sc around (30)
Rnd 7: (4 sc, inc) x 6 (36)
Rnd 8: (4 sc, dec) x 6 (30)
Rnd 9: (3 sc, 1 dec) x 6 (24)
Start stuffing but don;t overstuff because you will need to shape the cactus later on.
Rnd 10: (2 sc, dec) x 6 (18)
Rnd 11: dec around (9)
Fasten off, stuff some more if needed and sew close leaving a very long tail, to shape the cactus use the yarn needle, pass the yarn around the cactis to the opposite side and pull it trough the centre of the cactus to the starting point.
Leaf
Rnd 1: 4 sc in Mr
Rnd 2: (sc, inc) x 2 (6)
Rnd 3: (2 sc, inc) x 2 (8)
Rnd 4: sc around (8)
Fasten off, stuff slightly and sew on a side on top of the cactus.
Flowers (pink)
Big x1
Rnd 1: 6 sc in Mr
Rnd 2: (sc, ch 2, dc, ch 1, sl st in same st) x 6
Small x1
Rnd 1: 5 sc in Mr
Rnd 2: (sc, ch 1, dc, c 1, sl st in same st) x 5
Sew the big flower on top of the cactus to the opposite side of the leaf, and the small flower on top of the leaf.
Assembly
Sew the leaf on a side of the top of the cactus, add flowers (read flowers section) and sew your finished cactus on the centre of your pot.
Plant (2 ver)
Big Leaves x2
Rnd 1: 4 sc in Mr
Rnd 2: (sc, inc) x 2 (6)
Rnd 3: sc around (6)
Rnd 4: (2 sc, inc) x 2 (8)
Rnd 5-6: sc around (8)
Rnd 7: (3 sc, inc) x 2 (10)
Rnd 8-9: sc around (10)
Fold in half and sc through both sides
F.O. and leave a long tail.
Medium Leaves x2
Rnd 1: 4 sc in Mr
Rnd 2: (sc, inc) x 2 (6)
Rnd 3: sc around (6)
Rnd 4: (2 sc, inc) x 2 (8)
Rnd 5-8: sc around (8)
Fold in half and sc trough both sides.
F.O. and leave a long tail.
Small Leaves x3
Rnd 1: 4 sc in Mr
Rnd 2: (sc, inc) x 2 (6)
Rnd 3-4: sc around
Rnd 5: (2 sc, inc) x 2 (8)
Rnd 6-7: sc around
Fold in half and sc trough both sides.
F.O. and leave a long tail.
Assembly
- Sew each pair of leaves together (big+big/ medium+medium, small/small) leaving aside on of the small leaves.
- Now sew the medium leaves couple on the big one, just in the center but it opposite direction, to give the plant a bit of shape.
- Then do the same thing with the couple of small leaves, sew them on top of the medium leaves, just in the center, in a different direction than the others.
- Now sew the last small leaf on top of the others, just in the center.
- Sew your leave racking on top of your pot, right in the centre between R1/2.