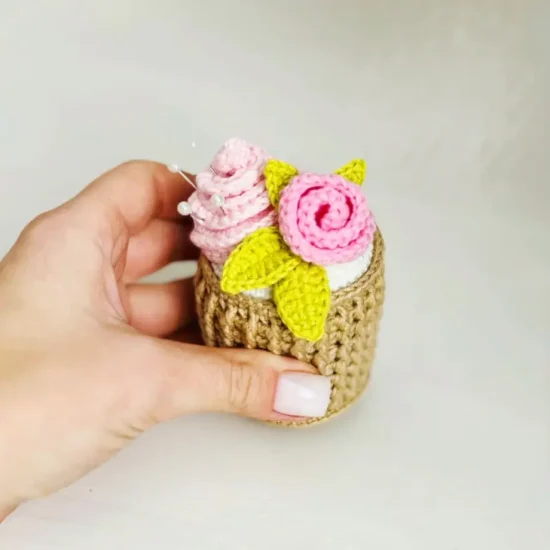
I am so excited to share with you this sweet cupcake pincushion crochet pattern! As a crocheter myself, I know the importance of having handy and cute tools for my crafting projects.
And what could be cuter than a cupcake-shaped pincushion? Not only can this pincushion hold your pins while you work, but it also adds a touch of sweetness to your crafting space.
Plus, this pattern is perfect for those looking to practice their crocheting skills or learn something new. So grab your hook and yarn, let’s get started on creating this adorable and functional sweet cupcake pincushion!
Pattern Designer: Fluffy Tummy
Materials
- Yarn in colors: beige, white, green, dark rose
- 1.75 mm crochet hook
Abbreviations
Mr – magic ring
Sc – single crochet
Inc – increase
Dec – decrease
Sl st – slip stitch
Ch – chain
Dc – double crochet
Cupcake Base
Start with beige yarn.
Rnd 1: 6 sc in Mr (6)
Rnd 2: inc * 6 (12)
Rnd 3: (1 sc, inc) * 6 (18)
Rnd 4: (2 sc, inc) * 6 (24)
Rnd 5: (3 sc, inc) * 6 (30)
Rnd 6: (4 sc, inc) * 6 (36)
Rnd 7: (5 sc, inc) * 6 (42)
Rnd 8: (6 sc, inc) * 6 (48)
Rnd 9: BLO: ch 3, 48 dc, sl st (48)
Cut a piece of plastic and place it inside your cupcake case.
Rnd 10-16: ch 3, (1 FPDC, 1 dc) *, sl st * (48)
Change color to white.
*Stuff your cupcake as you go.
Rnd 17: BLO: 48 sc (48)
Rnd 18-19: 49 sc (48)
Rnd 20: (6 sc, dec) * 6 (42)
Rnd 21: (5 sc, dec) * 6 (36)
Rnd 22: (4 sc, dec) * 6 (30)
Rnd 23: (3 sc. dec) * 6 (24)
Rnd 24: (2 sc, dec) * 6 (18)
Rnd 25: (1 sc, dec) * 6 (12)
Rnd 26: dec * 6 (6)
End off the last st, then use a yarn needle to run the tail through the sts and gather the opening closed.
Edging
- Hold the piece upside down. Attach yarn to the 1st loop of rnd 9 and work sc in each front loop around.
- Attach yarn to the 1st loop of rnd 17 and work sc in each front loop around.
Frosting
Use pink yarn.
Row 1: ch 81, start in the 2nd st from the hook, 90 sc, turn and work on the other side, 80 sc (80)
Flip your piece over so that you’re looking at the back side of your frosting piece. For the last row of your frosting, you’ll be crocheting into the “backbone” of the long chain you first made.
Row 2: in each backbone stitch you’ll make 1 sc until you reach the end of your frosting piece (80)
Roll the frosting and sew it on the cupcake top.
Leaves
Use green yarn.
Small Leaves x2
ch 6, start in 3rd st from hook, hdc inc, 1 hdc in next st, 1 sc, (1 sl st, ch 1, 1 sl st) * in next st, (turn and work on the other side), 1 sc, 1 hdc, 3 hdc in last st, sl st to 1st hdc (12)
Finish off. Leave a long tail for sewing.
Big Leaves x2
ch 9, start in 4th st from hook, dc inc, 2 dc, 1 hdc, 1 sc, (1 sl st, ch 1, 1 sl st) * in next st, (turn and work on the other side), 1 sc, 1 hdc, 2 dc, 3 dc in last st, sl st to 1st dc (16)
Finish off. Leave a long tail for sewing.
Rose
Use dark rose yarn.
Leaving a tail of approximately 6 inches, chain 21 (20 and 1 for turning).
Row 1: starting in the second chain from the hook, work 2 dc in each chain to the end of the row, turn (40)
Row 2: ch 3, work 2 tr in each stitch to the end of the row (80)
Roll your work into the desired rose shape with the begining at the centre. Secure your ends. Sew rose to the top of your cupcake.