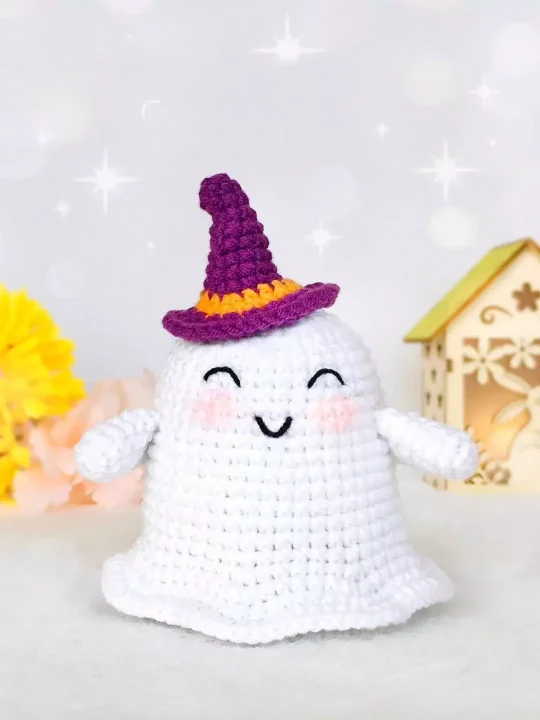
Well, folks, sometimes it’s those cutesy, unexpected things that catch our heart, isn’t it? That’s exactly how I felt when I stumbled upon the idea of crafting this teensy-weensy ghost adorned with a snazzy purple witch hat!
It’s a delightful fusion, really – the purity of a white ghost, innocent eyes peeping, and that purple hat, oh! It lends a mischievous twist that’s simply irresistible. I can’t help but chuckle thinking about this ghost trying to spook around, but being too darn cute to scare anyone! It’s almost as if it’s saying, “Boo! But, ya know, in a friendly way…”. Perfect for Halloween vibes, or honestly, any time you want a pinch of whimsy around.
I urge you to give this one a go. Every stitch you weave will bring this ghostie to life, and let me tell ya, once you’re done, you’ll be beaming with pride and maybe – just maybe – feeling a wee bit spooked (in the loveliest way possible!).
Designer: MarizzaToys
Materials
- Sport yarn (50g/160m)
- White (YarnArt Jeans #62)
- Purple (YarnArt Jeans #50)
- Orange (YarnArt Jeans #77)
- Black thread to embroider the eyes and the mouth
- 2 mm crochet hook
- Stuffing.
Size: 8-10 cm tall without the hat.
Abbreviations
Sc – single crochet
Inc – increase
Dec – decrease
Sl st– slip stitch
Arms x2
Crochet with the white yarn. Don’t stuff.
Rnd 1: 5 sc into a magic rin (5)
Rnd 2: 5 inc (10)
Rnd 3-7: 10 sc (5 rounds)
Fasten off and cut the yarn, leaving a long tail for sewing.
Bottom
Crochet wit the white yarn.
Rnd 1: 8 sc into a magic ring (8)
Rnd 2: 8 inc (16)
Rnd 3: (sc, inc) * 8 (24)
Rnd 4: sc, inc, (2 sc, inc) * 7, sc (32)
Rnd 5: (3 sc, inc) * 8 (40)
Rnd 6: 2 sc, inc, (4 sc, inc) * 7, 2 sc (48)
Rnd 7: (5 sc, inc) * 8 (56)
Rnd 8: (5 sc, 2 inc) * 8 (72)
Fasten off and cut the yarn.
Body
Crochet with the white yarn.
Stuff only the upper 2/3 of the body.
Rnd 1: 6 sc into a magic ring (6)
Rnd 2: 6 inc (12)
Rnd 3: (sc, inc) * 6 (18)
Rnd 4: sc, inc, (2 sc, inc) * 5, sc (24)
Rnd 5: (3 sc, inc) * 6 (30)
Rnd 6: 2 sc, inc, (4 sc, inc) * 5, 2 sc (36)
Rnd 7-9: 36 sc (3 rounds)
Rnd 10: (5 sc, inc) * 6 (42)
Rnd 11-13: 42 sc (3 rounds)
Rnd 14: 3 sc, inc, (6 sc, inc) * 5, 3 sc (48)
Rnd 15-20: 48 sc (6 rounds)
Rnd 21: (5 sc, inc) * 8 (56)
Rnd 22: (5 sc, 2 inc) * 8 (72)
Take the bottom and attach it to the body with pins so that the increases match.
Rnd 23: Crochet trough the body and the bottom:
6 sc, 2 inc, (7 sc, 2 inc) * 7, sc (88)
Rnd 24: 88 sc (88)
Fasten off and cut the yarn. Hide the yarn inside.
Hat
Start crocheting with the purple yarn.
Rnd 1: 6 sc into a magic ring (6)
Rnd 2-3: 6 sc (2 rounds)
Rnd 4: (sc, inc) * 3 (9)
Rnd 5-6: 9 sc (2 rounds)
Rnd 7: (2 sc, inc) * 3 (12)
Rnd 8: 12 sc (12)
Rnd 9: (3 sc, inc) * 3 (15)
Cange the yarn to orange color.
Rnd 10: (sc, inc) * 3 (18)
Rnd 11: 18 sc (18)
Change the yarn to purple color.
Rnd 12: 18 inc (36)
Rnd 13: 36 sc (36)
Make a sl st, fasten off and cut the yarn, leaving a long tail for sewing.
Assembly
- Using the black thread embroider the eyes in round 9. THey are 2 st wide and there are 4 st between them.
- Embroider the mouth in round 12. It’s 2 st wide.
- Sew the arms to the body in rounds 13-15. They should point slightly forward.
- Sew the hat to the top, tilted on one side.