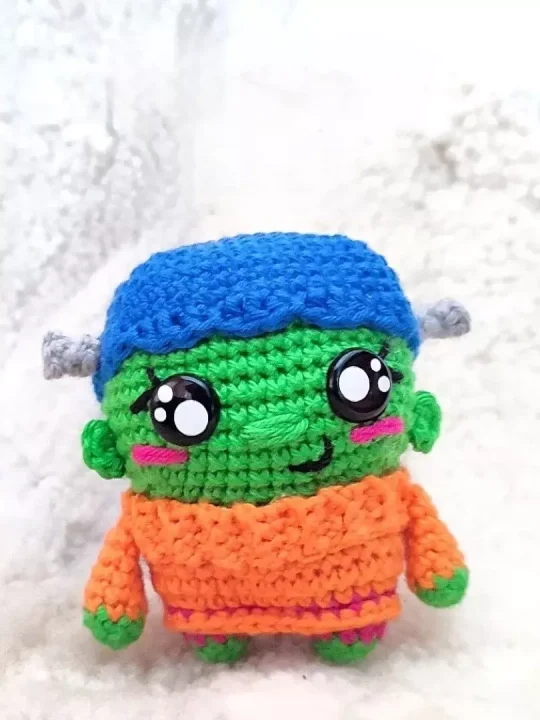
I’ve got to say, when I first laid eyes on this darling Frankenstein’s Monster crochet pattern floating around the interwebs, my heart did a little jig. There’s something about bringing such a classic yet often misunderstood character to life with yarn and a hook that feels nothing short of magical. And let’s be clear, this isn’t your typical spooky monster. Oh no, this little fella comes with the most endearing big ol’ eyes and a smile so wide, it could turn any frown upside down.
Crocheting this cutie pie was an adventure in stitches, truly! From the moment my hook dove into the yarn, it was like we were meant to be. The pattern, it’s a breeze to follow. Even those who might consider themselves just a stitch shy of a full skein could whip up this charmer without breaking a sweat. And those eyes… goodness, aren’t they just the windows to the soul?
Adding the smile – that’s when the magic happens. Suddenly, he’s not just a bundle of yarn anymore; he’s got a personality, a silent backstory of his very own. Give it a go, I say. You might just find yourself smitten with a green-skinned, beautifully stitched friend who’s ready to make every day a little less ordinary.
Designer: Nios Handmade
Materials & Tools
- Yarn of your choice in the following color:
- Green for body color
- Sweater color
- Trousers color
- Grey for the head screws
- Black and pink to embroider the face
- Any hook size to match your yarn
- Stitch marker to mark the beginning of the rounds
- Safety eyes
- Struffing material
- Tapestry needle
- Scissors
Abbreviations
Sc – single crochet
Mr – magic ring
Inc – increase
3 ple inc – triple increase (3 sc in same st)
Dec – decrease
3 ple dec – triple decrease (sc 3 sts together)
Hdc – half double crochet
Dc – double crochet
FL – front loop
BLO – back loop only
FLO – front loop only
BLO – back loop only
FO – fasten off
Notes
- THe pattern is worked from feet to top.
- The pattern is worked in continuous rounds (spiral)
- Create the legs by crocheting first one leg and the the second. Then, legsa will be joined and continue crocheting up in one part.
- Legs, body and head are crocheted in one piece.
Body
Use a green yarn.
Rnd 1: 6 sc in Mr (6)
Rnd 2: (1sc, 1 inc) x 3 (9) change to trousers color
Rnd 3: 9 sc (9)
FO leaving a long tail (you will need it for closing the gap which will be created after the join of the bowls)
Leg 1 is complete. Repeat R1 to R3 to create the second leg.
Do not cut yarn.
Rnd 4: make 3 ch and join the legs together with a sc in the first st of the first leg (this will be the first st of the round), 8 sc, 3 sc in 3 ch across, 9 sc, 3 sc on the other side of the 3 ch (24)
Rnd 5: (3 sc, inc) x 6 (30)
Close the gap between the legs. Change to sweater color.
Rnd 6: BLO (2 sc, inc, 2 sc) x 6 (36)
Rnd 7-8: 36 sc (36)
Rnd 9: BLO (2 sc, dec, 2 sc) x 6 (30) Change to green color.
Stuff the body and continue with the head.
Rnd 10: (3 sc, dec) x 6 (24)
Rnd 11: (2 sc, 3 ple-inc, 4 sc, 3 ple-inc, 4 sc) x 2 (32)
Rnd 12: (3 sc, 3 ple-inc, 6 sc, 3 ple-inc, 5 sc) x 2 (40)
Rnd 13: (4 sc, 3 ple-inc, 8 sc, 3 ple-inc, 6 sc) x 2 (48)
Rnd 14-21: 48 sc (48)
Rnd 22: (4 sc, 3 ple-dec, 8 sc, 3 ple-dec, 6 sc) x 2 (40)
Rnd 23: (3 sc, 3 ple-dec, 6 sc, 3 ple-dec, 5 sc) x 2 (32)
Place safety eyes between round 16-17 8 sts apart.
Rnd 24: (2 sc, 3 ple-dec, 4 sc, 3 ple-dec, 4 sc) x 2 (24)
Rnd 25: (sc, 3 ple-dec, 2 sc, 3 ple-dec, 3 sc) x 2 (16)
Complete stuffing.
Rnd 26: (3 ple-dec, 3 ple-dec, 2 sc) x 2 (8)
FO leaving a long tail to close the remainin hole with a tapestry needle by sewing in the front loops together and weave in the ends.
Neck
With sweater color. Work in rows.
With your hook pointing up (head) join yarn in first FL of R8.
Make 4 ch, turn.
Row 1: sc in 2nc ch from the hook and in each ch across, 2 sl st in the next FL of R8, turn
Row 2: in BLO 3 sc, ch turn
Row 3: in BLO 3 sc, 2 ls st in the next FL of R8
Repeat row 2 and 3 until the end of the round. FO leaving a ling tail to sew both ends together.
Bottom Part of the Sweater
With sweater color.
With your hook pointing down (legs) join yarn in last FL of R5
30 sc in FLO of R5
FO and weave in the ends.
Hair
Start with hair color.
Rnd 1: 8 sc in Mr (8)
Rnd 2: (3 ple-inc, 3 ple-inc 2 sc) x 2 (16)
Rnd 3: (sc, 3 ple-inc, 2 sc, 3 ple-inc 3 sc) x 2 (24)
Rnd 4: (2 sc, 3 ple-inc, 4 sc, 3 ple-inc 4 sc) x 2 (32)
Rnd 5: (3 sc, 3 ple-inc, 6 sc, 3 ple-inc 5 sc) x 2 (40)
Rnd 6: (4 sc, 3 ple-inc, 8 sc, 3 ple0inc 6 sc) x 2 (48)
Rnd 7-10: 48 sc (48)
Rnd 11: 9 tr, 7 dc, sl st, (hdc, dc, hdc, sl st) x 4, 7 dc, 8 tr, sl st to first st
Arms x2
Start with green.
Rnd 1: 6 sc in Mr (6)
Rnd 2: (1 sc, inc) x 3 (9) change to sweater color.
Rnd 3-7: 9 sc (9)
Do not stuff or stuff only the first 3 rows.
FO and leave a long tail for sewing. Sew it close.
Ears x2
With green yarn.
Rnd 1: 5 sc in Mr (5)
FO and leave a long tail for sewing.
Screws x2
With grey yarn. Leave a long til at the beginning.
Rnd 1: 3 sc in Mr (3)
Rnd 2: 3 sc inside out (so that the beginning strand of the mr is outside.
Rnd 3: (continue inside out) inc x 3 (6)
Fasten off.
Assembly
- Sew the hairs form on the top of the head.
- Sew the screws with the strand of the Mr on both sides of the hairs in R11.
- Sew the ears on both sides of the head in R15-16, 4 sts apart from each eye.
- Sew the arms on both sides of the neck.
- Embroider the face.