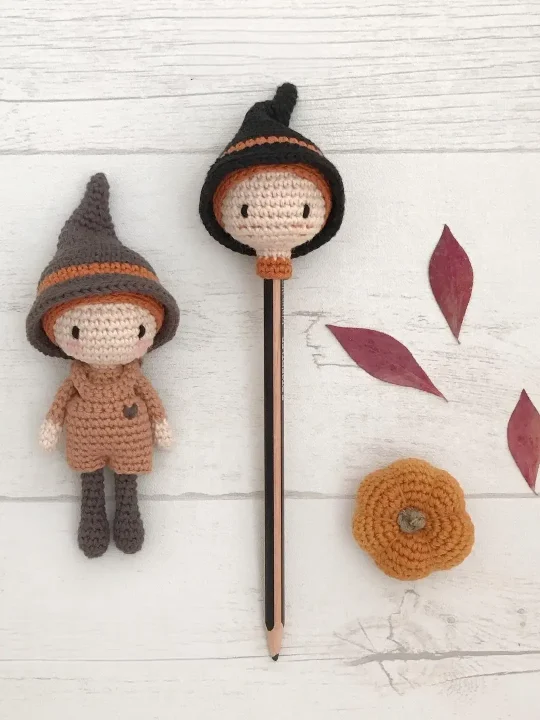
Hello my crafty friends, I absolutely adore posting projects that you can whip up for your little ones, and today I’m excited to share this super fun pencil topper pattern that will definitely add some pizzazz to your child’s school day. This topper is fashioned in the shape of a wizard’s head complete with a quirky, stylish hat.
This pattern is a breeze to make, requiring only basic crochet stitches. We begin with the head, working it in 20 rounds, then swiftly move on to the hat (don’t forget to add a stripe for extra flair!), and finally, we stitch it all together and voilà!
Designer: Lulu Compotine
Materials & Tools
- 3 different cotton colors
- 2 mm or 2.25 mm crochet hook
- Tapestry needle
- Scissors
- A small amount of polyester toy stuffing
- A pretty pencil or a stick
Abbreviations
Mr – magic ring
Sc – single crochet
Dec – decrease
Inc – increase
Sl st – slip stitch
BLO – back loop only
Head
With beige and rust yarn. Crochet from top to bottom.
Rnd 1: 6 sc in magic ring (6)
Rnd 2: 6 inc (12)
Rnd 3: (1 sc, 1 inc) x 6 (18)
Rnd 4: (2 sc, 1 inc) x 6 (24)
Rnd 5: (3 sc, 1 inc) x 6 (30)
Rnd 6: (4 sc, 1 inc) x 6 (36)
Rnd 7-13: 36 sc, 7 rounds (36)
Rnd 14: (4 sc, 1 dec) x 6 (30)
Rnd 15: (1 sc, 1 dec) x 10 (20)
Rnd 16: 10 dec (10)
Rnd 17-18: 10 sc, 2 rounds (10)
Rnd 19-20: Rust 10 sc, 2 rounds (10)
Fasten off. Cut and hide the remaining yarn tail.
Stuff the head firmly.
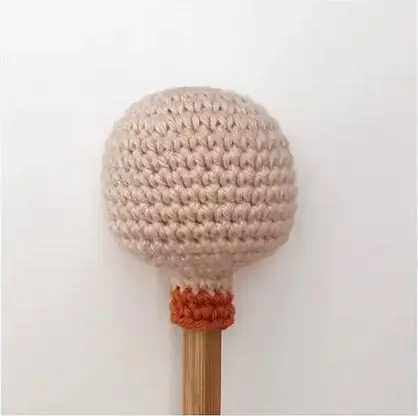
Embroider the eyes at round 11 with a 6 stitch space between them. Also, embroider a few freckles.
Slide a stick or pencil into the neck, pushing the stuffing a little. Hold in place with a dot of glue.
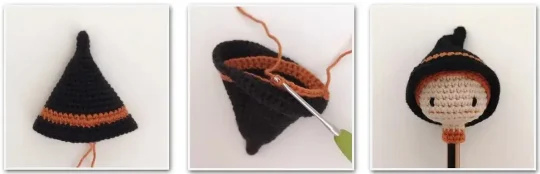
Hat
Use black and rust yarn.
Rnd 1: Black 4 sc in magic ring (4)
Rnd 2: (1 sc, 1 inc) x 2 (6)
Rnd 3: 6 sc (6)
Rnd 4: (2 sc, 1 inc) x 2 (8)
Rnd 5: 8 sc (8)
Rnd 6: (1 sc, 1 inc) x 4 (12)
Rnd 7: 12 sc (12)
Rnd 8: (2 sc, 1 inc) x 4 (16)
Rnd 9: 16 sc (16)
Rnd 10: (3 sc, 1 inc) x 4 (20)
Rnd 11: 20 sc (20)
Rnd 12: (4 sc, 1 inc) x 4 (24)
Rnd 13: 24 sc (24)
Rnd 14: (3 sc, 1 inc) x 6 (30)
Rnd 15: 30 sc (30)
Rnd 16: (4 sc, 1 inc) x 6 (36)
Rnd 17-18: 36 sc, 2 rounds (36)
Rnd 19: Rust 36 sc (36)
Rnd 20: (5 sc, 1 inc) x 6 (42)
Do not cut the rusty thread. Take up the black thread.
Rnd 21: Black (in FLO), 3 sc, 1 inc, (6 sc, 1 inc) x 5, 3 sc (48)
Rnd 22: (7 sc, 1 inc) x 6 (54)
Rnd 23: 54 sl st around in BLO (54)
Cut and hide the black thread. Take up the rust thread left over and crochet the inside of the hat:
Rnd 24: (in the front loop of round 21) 42 sc (42)
Rnd 25: (5 sc, 1 dec) x 6 (36)
Rnd 26: 36 sl st around in BLO (36)
Fasten off. Cut and hide the remaining yarn tail. Side the hat over the head and sew in place.