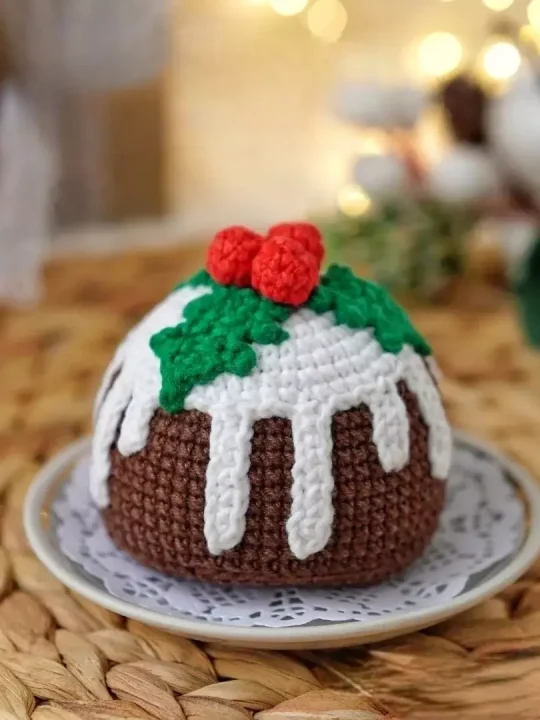
Whoa, have I got a treat for you today! Picture this – a holiday table graced with the cutest little Christmas pudding, and guess what… it’s handmade by you! That’s right, we’re diving into a crochet pattern that’s as delightful as it is dainty. So, grab your crochet hook, and let’s get crafty with this adorable pudding pattern I stumbled upon online.
First things first, you’re gonna want to rummage through your yarn stash for some cozy brown and creamy white shades. Oh, and don’t forget a pinch of green and red for that traditional holly topping – it’s all about the details, amirite? As you embark on this project, you’ll be a stitching whiz, working in the round and switching colors like it’s no big deal. The magic of the pattern is in its simplicity, and before you know it, you’ll have a squishy little dessert that won’t add an inch to your waistline – win-win!
Honestly, this pattern gets me all giddy inside every time I hook that delightful holly leaf detail. But hey, let’s not get ahead of ourselves. First up, you’re going to conquer the base with ease, then whip up that icing like a pro. As the finishing touch, the holly leaves and berries come to life, making this treat unmistakably Christmas-ready. Trust me, once you’ve made one, you’ll be itching to pop out a whole platter of these.
Perfect for sprucing up your home or gifting to your pals, this pattern is a true holiday hero. Can’t wait to see your festive masterpieces!
Designer: Fayni Toys
Materials & Tools
- Sport weight yarn (160 m/50g)
- Colors: brown, white, red, green
- 1.75 mm crochet hoo
- Peace of plastic or thick cardboard (to seal the bottom)
- Pins
- Stitch marker or contrasting thread
- Scissors
- Fiberfill
- Needle for sewings
Abbreviations
Mr – magic ring
Sc – single crochet
Inc – increase
Dec – decrease
Ch – chain
Sl st – slip stitch
Ch-3 picot – ch 3, slip stitch back into first c
BLO – back loop only
Pudding
Rnd 1: 6 sc in Mr (6)
Rnd 2: 6 inc (12)
Rnd 3: (1 sc, inc) x 6 (18)
Rnd 4: 1 sc, inc, (2 sc, inc) x 5, 1 sc (24)
Rnd 5: (3 sc, inc) x 6 (30)
Rnd 6: 2 sc, inc, (4 sc, inc) x 5, 2 sc (36)
Rnd 7: (5 sc, inc) x 6 (42)
Rnd 8: 3 sc, inc, (6 sc, inc) x 5, 3 sc (48)
Rnd 9: (7 sc, inc) x 6 (54)
Rnd 10: 4 sc, inc, (8 sc, inc) x 5, 4 sc (60)
If you want to make the bottom as flat as possible, cut out of plastic or thick cardboard a circle equal in diameter to the crocheted circle you have now. This is optional.
Rnd 11: BLO 60 sc (60)
Rnd 12-20: 60 sc (9 rounds)
Rnd 21: 4 sc, dec, (8 sc, dec) x 5, 4 sc (54)
Insert the prepared plastic circle inside. To make the structure more durable, you can optionally glue the plastic circle with a glue gun.
Rnd 22: (7 sc, dec) x 6 (48)
Rnd 23: 3 sc, dec, (6 sc, dec) x 5, 3 sc (42)
Rnd 24: (5 sc, dec) x 6 (36)
Stuff toy as you go.
Rnd 25: 2 sc, dec, (4 sc, dec) x 5, 2 sc (30)
Rnd 26: (3 sc, dec) x 6 (24)
Rnd 27: 1 sc, dec, (2 sc, dec) x 5, 1 sc (18)
Rnd 28: (1 sc. dec) x 6 (12)
Rnd 29: 6 dec (6)
Fasten off, pull the hole closed and weave in the yarn ends.
Icing
Rnd 1: 6 sc in a Mr (6)
Rnd 2: 6 inc (12)
Rnd 3: (1 sc, inc) x 6 (18)
Rnd 4: 1 sc, inc, (2 sc, inc) x 5, 1 sc (24)
Rnd 5: (3 sc, inc) x 6 (30)
Rnd 6: 2 sc, inc, (4 sc, inc) x 5, 2 sc (36)
Rnd 7: (5 sc, inc) x 6 (42)
Rnd 8: 3 sc, inc, (6 sc, inc) x 5, 3 sc (48)
Rnd 9: In this round you should crochet icing drips: ch 7, start in the second ch from the hook: 6 sc, 3 sc on the base (into the sc of previous round), ch 9, start in the second ch from the hook: 8 sc, 5 sc on the base. Continue crocheting in the same way, alternating the length of the chains and the number of sc on the base between them to your taste. I made 11 drips.
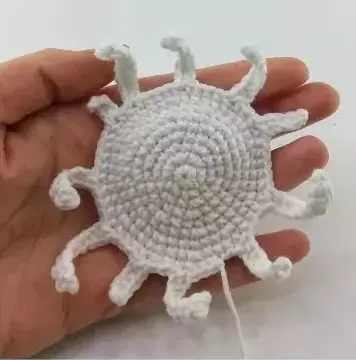
After you have crocheted the drips completely over the entire round, fasten off and leave a long tail for sewing.
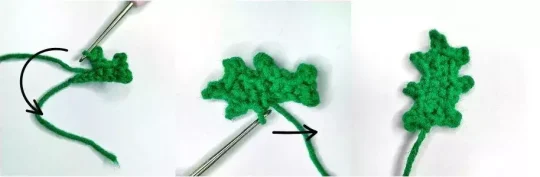
Leaves x3
Rnd 1: ch 7, start in the second ch from the hook: sl st, (ch-3 picot, 2 sc) x 2, sc + ch-3 picot + sc in one ch (last loop of the chain), continue crocheting on the other side of the chain: (ch-3 picot, 2 sc) x 2, ch-3 picot, sl st.
Fasten off and leave a long tail for sewing.
Berries x3
Rnd 1: 6 sc in a Mr (6)
Rnd 2: 6 inc (12)
Rnd 3: 12 sc (12)
Stuff the piece.
Rnd 4: 6 dec (6)
Fasten off, pull the hole closed and leave a long tail for sewing.
Assembly
- Attach the icing to the top center of the pudding and secure with pins.
- Sew it along the perimeter, including the drips.
- Center the leaves on top of the icing, secure with pins and sew on.
- Sew the berries on top, in the enter between the leaves.