Hey there, my craft-loving friends! Hold onto your hooks because I’ve got a blast from the past for y’all: a Tamagotchi crochet pattern! Ah, just like those little digital pets, this pattern instantly brings some nostalgic warmth. Bear in mind, it takes a little patience, but, oh boy, it’s so worth it, just like the old days of waiting for your Tamagotchi egg to hatch.
This project is pretty straightforward, great for experienced crocheters and bold beginners ready to take on a nostalgic challenge. Just a couple of tips here- remember to keep those stitches nice and tight, and pick vibrant yarn colors to give your crochet toy that authentic, retro look.
So, dust off your crochet hooks and get ready for a trip down memory lane – Tamagotchi style!
Designer: Oliyanko Amigurumi
Materials
- YarnArt Jeans in Baby Blue (75)
- YarnArt Jeans in Yellow (35)
- YarnArt Jeans in Grey (49)
- YarnArt Jeans in Pink (36)
- Black embroidery thread and needle
- 2.0 mm crochet hook
- Scissors
- Stitch marker
Abbreviations
Mr – magic ring
Sc – single crochet
Inc – increase
Dec – decrease
Ch – chain
Base
Use light blue color. Stuff as you go, but don’t overstuff to keep the shape oval and flat.
Rnd 1: 6 sc in Mr (6)
Rnd 2: inc x 6 (12)
Rnd 3: (1 sc, inc) x 6 (18)
Rnd 4: (2 sc, inc) x 6 (24)
Rnd 5: 4 sc, inc, 2 sc, inc, 8 sc, inc, 2 sc, inc, 4 sc (28)
Rnd 6: 6 sc, inc, 14 sc, inc, 6 sc (30)
Rnd 7: 6 sc, NC, 16 sc, inc, 6 sc (32)
Rnd 8: 7 sc, inc, 16 sc, inc, 7 sc (34)
Rnd 9: 7 sc, inc, 18 sc, inc, 7 sc (36)
Rnd 10: 8 sc, inc, 18 sc, inc, 8 sc (38)
Rnd 11: 8 sc, inc, 20 sc, inc, 8 sc (40)
Rnd 12-16: sc in all 40 sc (5 rounds) (40)
Rnd 17: 8 sc, dec, 20 sc, dec, 8 sc (38)
Rnd 18: 8 sc, dec, 18 sc, dec, 8 sc (36)
Rnd 19: 7 sc, dec, 18 sc, dec, 7 sc (34)
Rnd 20: 7 sc, dec, 16 sc, dec, 7 sc (32)
Rnd 31: 6 sc, dec, 16 sc, dec, 6 sc (30)
Rnd 31: 6 sc, dec, 14 sc, dec, 6 sc (28)
Rnd 32: 4 sc, dec, 2 sc, dec, 8 sc, dec, 2 sc, dec, 4 sc (24)
Rnd 33: (2 sc, dec) x 6 (18)
Rnd 34: (1 sc, dec) x 6 (12)
Rnd 35: dec x 6 (6)
Fasten off, weave in the tail.
Screen
Using gray yarn.
- Make a chain 8, then start with a sc in the second st from the hook, continue with 1 sc in next 6 stitches.
- At the end of the chain turn and make sc in each st.
- Repeat 4 more times (total 6 rows).
- Make a sc in each st on each side of the square. At the end of each side make 1 ch before turning to new side.
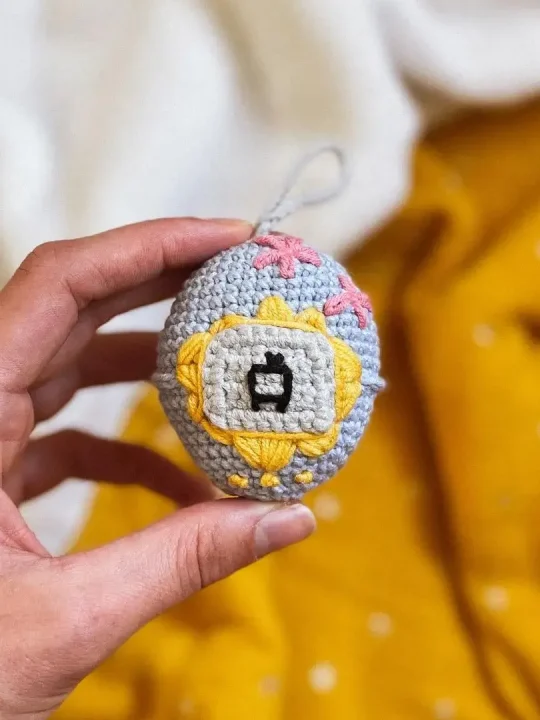
Lazy Daisy Flower
Use pink yarn.
- Insert the needle through the back if the toy and pull where you want the centre of the flower to be.
- Insert the needle in the same and remove half way where you want your petal to end.
- Loop the yarn around the tip of the needle, pull the needle out to tighten the loop and insert again behind the loop created to finish the petal.
- Repeat 3-4 more times on different sides to make a flower.
Details
- Using yellow yarn, embroider the cracked egg shell around the screen and 3 buttons (simple knots).
- Using black yarn, embroider your choice of character inside of the screen.
- Make ch 25 with blue yarn to create the centre crack of the egg, that you simply place around the body, then using needle pull the yarn from one end of the chain under the screen and tighten with the other end on the side of the screen. Then hide both ends.
- Make ch 30 with grey yarn to make a holding loop and secure it around the magic ring on top of the egg.