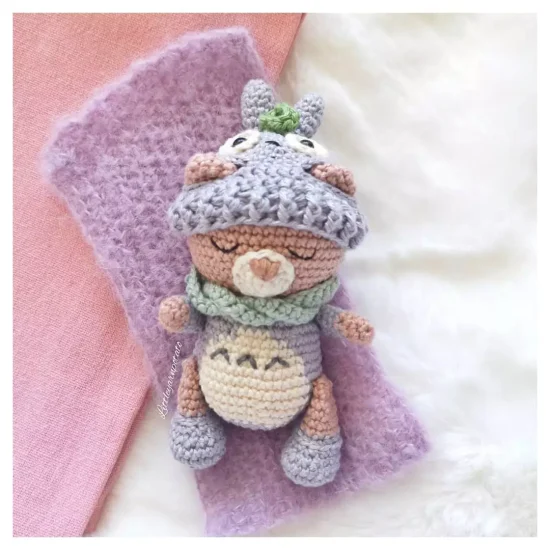
You know, there’s something intrinsically magical about merging two worlds – especially when it involves yarn and my beloved Studio Ghibli memories. And just like that, out of my crochet dreams, the amigurumi Totoro bear was born! Think about it: Totoro, that spirit of the forest, meeting the gentle charm of a bear. It’s like a fairytale of threads and dreams.
Now, don’t get me wrong; this isn’t your everyday crochet. It’s a dance of nostalgia and creativity. Each stitch brought back those lazy afternoons spent in front of the TV, lost in Miyazaki’s world. So, if you’ve got a hankering for a project that stirs the heartstrings and tingles the fingertips – oh, honey, you’re in for a treat!
So, here’s my invitation for you: Come along on this whimsical journey and let’s bring this enchanting creature to life. Grab your favorite hook, dive into your yarn stash, and let’s give some tender, loving craft to our Totoro bear.
Pattern Designer: Little Yarn Potato
Materials
- 4 ply 100% cotton yarn (Scheepjes Catona Yarn) in colors – brown, grey, off white, green and mint gree
- 2.20 mm crochet hook
- Black embroidery thread
- Stuffing
- Scissors
- Sewing needle and pins
- Stitch markers
- 5 mm safety eyes
Abbreviations
Mr – magic ring
Sc – single crochet
Inc – increase
Dec – decrease
Ch – chain
FLO – front loops only
Dc – double crochet
Hdc – half double crochet
Head
Rnd 1: 6 sc in Mr (6)
Rnd 2: inc x 6 (12)
Rnd 3: (inc, sc) x 6 (18)
Rnd 4: (inc, 2 sc) x 6 (24)
Rnd 5: (inc, 3 sc) x 6 (30)
Rnd 6: (inc, 4 sc) x 6 (36)
Rnd 7: (inc, 5 sc) x 6 (42)
Rnd 8: 42 sc (42)
Rnd 9: (inc, 6 sc) x 6 (48)
Rnd 10-15: 48 sc (48)
Rnd 16: (dec, 6 sc) x 6 (42)
Rnd 17: 42 sc (42)
Rnd 18: (dec, 5 sc) x 6 (36)
Rnd 19: (dec, 4 sc) x 6 (30)
Rnd 20: (dec, 3 sc) x 6 (24)
Begin to stuff head and continue to stuff as you go.
Rnd 21: FLO 24 sc
Change to grey yarn, you can cut brown yarn. We will continue to work on the body.
Rnd 22: (inc, 3 sc) x 6 (30)
Rnd 23: (inc, 4 sc) x 6 (36)
The next few rounds we will switching between grey and off-white color (as indicated in the respective colors) yarns to make the tummy patch.
Rnd 24: 14 sc, 4 sc, 18 sc (36)
Rnd 25: 12 sc, 8 sc, 16 sc (36)
Rnd 26: 11 sc, 10 sc, 15 sc (36)
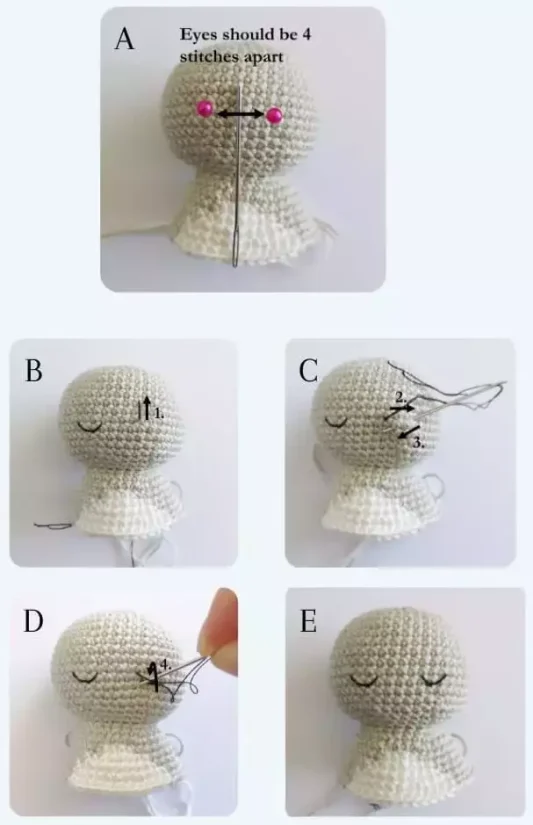
You can embroider on the eyes at this stage.
Guide for embroidering sleepy eyes
Sew eyes on rnd 14, using the white belly patch as an indication of where the front of the face should be.
Sleepy eyes should be sewn between rnd 14 and 15, 3 sts wide, 4 sts apart.
Body
Rnd 27: inc, 5 sc, inc, 4 sc, sc, inc, 5 sc, inc, 3 sc, 2 sc, inc, 5 sc, inc, 5 sc (42)
Rnd 28-29: 13 sc, 13 sc, 16 sc (42)
Rnd 30: inc, 6 sc, inc, 5 sc, sc, inc, 6 sc, inc, 5 sc, sc, (inc, 6 sc) x 2 (48)
Rnd 31: 15 sc, 16 sc, 17 sc (48)
Rnd 32: dec, 6 sc, dec, 5 sc, sc, dec, 6 sc, dec, 5 sc, sc, (dec, 6 sc) x 2 (42)
Rnd 33: (dec, 5 sc) x 2, dec, 5 sc, dec, 3 sc, 2 sc, (dec, 5 sc) x 2 (36)
Rnd 34: 12 sc, 10 sc, 14 sc (36)
You can now cut the off-white yarn and continue working on the rest of the body in grey yarn.
Rnd 35: (dec, 4 sc) x 6 (30)
Stuff the body firmly and continue to stuff as you go.
Rnd 36: (dec, 3 sc) x 6 (24)
Rnd 27: (dec, 2 sc) x 6 (18)
Rnd 38: (dec, sc) x 6 (12)
Rnd 39: dec x 6 (6)
Fasten off and cut yarn leaving a small yarn tail. Close the hole by weaving the yarn tail through the front loops of the last round and pulling tight.
Use dark grey yarn to sew three little arrow on the tummy area.
Scarf
Use mint green color.
Ch 60. Beginning from the third chain from the hook, hdc 58, fasten off and then weave in the loose ends.
Arms x2
Start with brown yarn.
Rnd 1: 5 sc in Mr (5)
Rnd 2: (inc, 1 sc) x 2, inc (8)
Rnd 3: 8 sc (8) Change to grey yarn.
Rnd 4-8: 8 sc (8)
Stuff arm slightly. Fold the arm in half and 4 sc through both layers of the opening to close, leave yarn tail to sew.
Legs x 2
Start with grey yarn.
Rnd 1: 5 sc in Mr (5)
Rnd 2: (inc) x 5 (10)
Rnd 3: (inc, sc) x 5 (15)
Rnd 4: (inc, 2 sc) x 5 (20)
Rnd 5: 20 sc (20)
Rnd 6: 6 sc, dec, sc, 2 dec, sc, dec, 4 sc (16)
Rnd 7: 6 sc, 2 dec, 6 sc (14)
Rnd 8: 4 sc, dec, 2 sc, dec, 4 sc (12)
Rnd 9: change to brown yarn, BLO 12 sc (12)
Rnd 10-11: 12 sc (12)
Rnd 12: (dec, 2 sc) x 3 (9)
Rnd 13: (dec, sc) x 3 (6)
Stuff the base of the foot and fasten off. Close the hole by weaving the yarn tail through the front loops of the last round and pulling tight. Leave a long yarn tail for sewing to body.
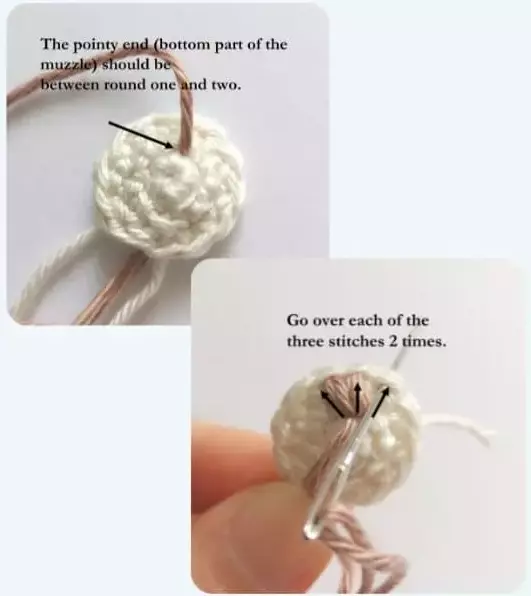
Bear Muzzle
Start with off white yarn.
Rnd 1: 5 sc in Mr (5)
Rnd 2: inc x 5 (10)
Rnd 3: (inc, 4 sc) x 2 (12)
Invisible fasten off and leave yarn tail to sew to head.
Sew a triangular-shaped nose patch onto the muzzle. The nose should be three sts wide at the top.
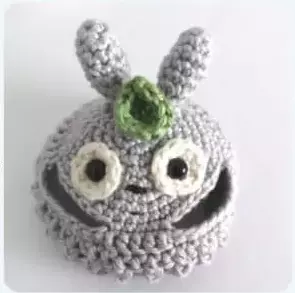
Totoro Beanie
Rnd 1: 6 sc in Mr (6)
Rnd 2: inc x 6 (12)
Rnd 3: (inc, sc) x 6 (18)
Rnd 4: (inc, 2sc) x 6 (24)
Rnd 5: (inc, 3sc) x 6 (30)
Rnd 6: (inc, 4sc) x 6 (36)
Rnd 7: (inc, 5sc) x 6 (42)
Rnd 8: 42sc (42)
Rnd 9: 13sc, ch10, skip 7sts, 5sc, 10ch, skip 7sts, 10sc (48)
Rnd 10: 13dc, 10sc (on the top loops of the ch10), 5dc, 10sc (on the top loops of the other ch10), 10dc (48)
Rnd 11: dc48, sl st to the first st (48)
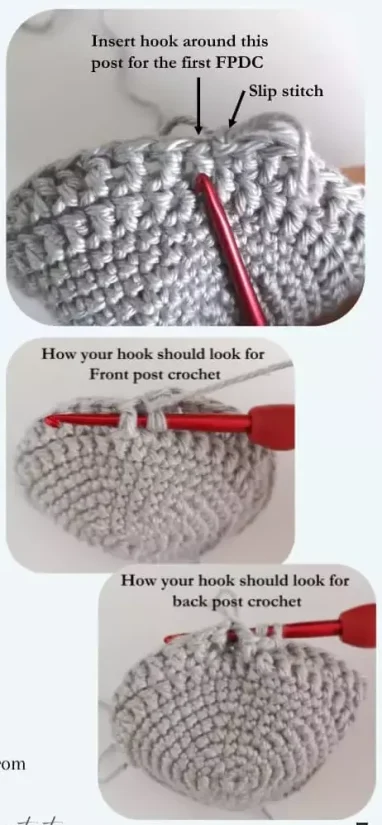
Rnd 12-13: Ch1, then (fpdc* in the first st, then bpdc* in next st) x 24, slst in first st- 2 rnds (48)
Fasten off and cut yarn, then weave in the yarn ends. (48)
Totoro Ears x2
Start with grey yarn.
Rnd 1: 5 sc in Mr (5)
Rnd 2: (inc, 1 sc) x 2, inc (8)
Rnd 3-4: 8 sc (8)
Rnd 5: (inc, 3 sc) x 2 (10)
Rnd 6: (dec, 3 sc) x 2 (8)
Rnd 7: (dec, sc) x 2, dec (5)
Rnd 8: 5 sc (5)
Sruff ears lightly. Fasten off and leave yarn tail. Sew ears 2 st apart and between rnd 3-5.
Eye Patches for Totoro x2
Start with off-white yarn.
Rnd 1: 5 sc in Mr (5)
Rnd 2: (inc) x 5 (10)
Invisible fasten off and leave yarn tail to sew to the beanie.
Insert safety eyes in the middle of the eye patches and then poke the safety eyes through at the front of the beanie (the eat holes indicate the front of the beanie), in-between rnd 5-6 of the beanie, 8 sts apart (the eye patches will look around 3 to 4 sts apart). Sew around the eye patches to secure to beanie.
Leaf for Totoro Beanie
Start with green yarn.
Ch 6, beginning from second chain from hook: 1 sc, 1 hdc, (1 dc, 1 tr), 1 dc, 1 hdc, then continuing on other side of chain, 1 hdc, 1 dc, (1 tr, 1 dc), 1 hdc, 1 sc, sl st to first st (12)
Invisible fasten off, cut yarn, leaving a yarn tail. Sew the leaf onto rnd one of the beanie.
Embroider nose between eye patches on rnd 5-6, and a small line for the mouth between rnd 7-8.
Bear Ears x2
Start with brown yarn.
Rnd 1: 5 sc in Mr (5)
Rnd 2: (inc) x 5 (10)
Rnd 3: (inc, sc) x 5 (15)
Rnd 4: 15 sc (15)
Fasten off and leave yarn tail for sewing to head. To make sure that the beanie fits on the head, recommended to make the beanie before sewing the eats on, so that you can pin the eats onyo the head where the ear holes on the beanie are, prior to sewing on.
Beat Tail
Start with brown yarn.
Rnd 1: 5 sc in Mr (5)
Rnd 2: (inc, 1 sc) x 2, inc (8)
Rnd 3: 8 sc (8)
Rnd 4: (dec, sc) x 2, dec (5)
Stuff the tail lightly, fasten off, and leave a yarn tail for sewing to the body.
Sew tail in the middle of the back of the body, rnd 8-9 from the bottom.
Assembly
- Ears: pinch ears together slightly, (not too much or it may not fit into the ear holes on the beanie) before sewing them onto the head. Put the beanie on the bear and pin the ears in place where the ear holes are, prior to sewing.
- Muzzle: sew the muzzle onto the face – the top of the muzzle should be on rnd 14 and be positioned in-between the eyes.
- Arms: sew arms facing forward, in the middle of the side of the body, between rnd 23 and 26.
- Legs: the top of the leg should be between rnd 29-30. Sew the foot behind the tummy patch, the angle of the foot should follow the curve of the white tummy patch.
- Scarf: tie the scarf once around the neck, and push the sides down around neck.