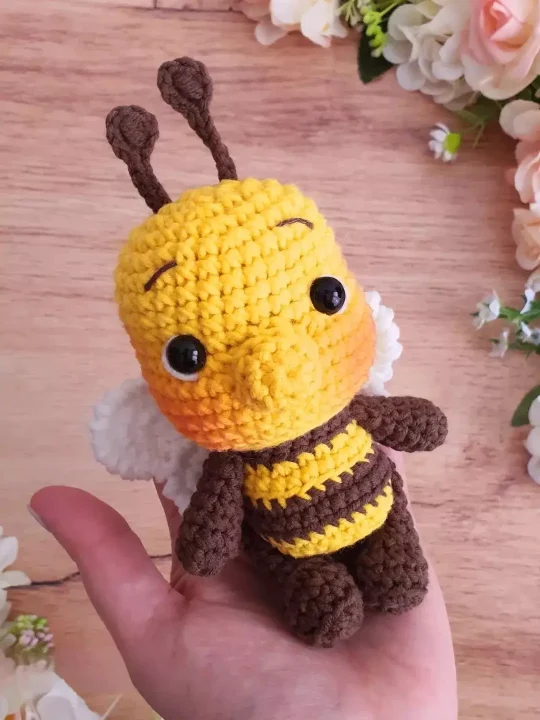
Oh, honey, have I got a pattern that’s the bee’s knees for you! My latest crochet masterpiece is none other than this Sweet Bee pattern. When my hook first touched the yarn for this one, I was humming in delight, let me tell ya. It’s almost like the crochet gods whispered, “Make something that will bee amazing.” And who can resist those adorable wings and that stripey little body? Not me, that’s for sure.
I’m all a-buzz just thinking about the countless places you could put this cute-as-a-button bee. On a windowsill, perhaps? Or as a plushie for a kiddo who’s all about bugs? No matter where this bee finds its hive, it’ll add a dash of sweetness, for sure.
Trust me, once you dive into this project, you’ll bee as hooked as I was!
Pattern Designer: Vivir Vintage
Materials
- 3.5 gauge yellow cotton yarn
- 3.5 gauge white cotton yarn
- 3.5 gauge brown cotton yarn
- 2.0 gauge brown cotton yarn
- Fiberfill stuffing
- Scissors
- Stitch marker
- 3.5 mm crochet hook
- Tapestry needle
- Embroidery needle
- 10 mm safety eyes
- Pink fabric marker
- Brush
Abbreviations
Mr – magic ring
Sc – single crochet
Inc – increae
3 sc inc – triple inc
Dec – decrease
Ch – chain
Sl st – slip stitch
Tsc – twisted single crochet
Puff – puff stitch
Legs x4
Brown cotton yarn.
Rnd 1: 6 sc in Mr (6)
Rnd 2: inc. Repeat 6 times (12)
Rnd 3: through the back loop only:
1 sc in each stitch (12)
Rnd 4: 1 sc in each stitch (12)
Rnd 5: 2 sc, 4 dec, 2 sc (8)
Rnd 6-9: 1 sc in each stitch (8)
Fasten off and leave a long tail for sewing.
Stuff lightly with fiberfill.
Big Wings x2
White cotton yarn.
Rnd 1: 8 sc in Mr (8)
Rnd 2: sc, sc, 3 sc inc, 3 sc inc, sc, sc, 3 sc inc, 3 sc inc (16)
Rnd 3: sc, sc, sc, sc, 3 sc inc, 3 sc inc, sc, sc, sc, sc, sc, sc, 3 sc inc, 3 sc inc (24)
Rnd 4: Tsc all around
Fasten off and leave a long tail for sewing.
Small Wings x2
White cotton yarn.
Rnd 1: make a magic ring of 8 stitches (8)
Rnd 2: sc, sc, 3 sc inc, 3 sc inc, sc, sc, 3 sc inc, 3 sc inc (16)
Rnd 3: sc, sc, sc, sc, 3 sc inc, 3 sc inc, sc, sc, sc, sc, sc, sc, 3 sc inc, 3 sc inc (24)
Rnd 4: Tsc all around
Fasten off and leave a long tail for sewing.
Nose
Yellow cotton yarn.
Rnd 1: 8 sc in Mr (8)
Rnd 2: 1 sc in each stitch (8)
Fasten off and leave a long tail for sewing.
Antenna x2
Brown cotton yarn.
Start by leaving a long lefrover yarn of about 20 cm.
Chain 10. Starting from the fourth chain from the hook, work: 1 puff, chain 3 and continue with 7 sl st.
Fasten off and leave a long tail for sewing. We will use the starting yarn and the ending yarn to sew the antennas more easily.
Head & Body
Yellow cotton yarn.
Rnd 1: 6 sc in Mr (6)
Rnd 2: inc. Repeat 6 times (12)
Rnd 3: 1 sc, 1 inc. Repeat 6 times (18)
Rnd 4: 2 sc, 1 inc. Repeat 6 times (24)
Rnd 5: 3 sc, 1 inc. Repeat 6 times (30)
Rnd 6-10: 1 sc in each stitch (30)
Rnd 11: 10 sc, inc, inc, inc, 4 sc, inc, inc, inc, 10 sc (36)
Rnd 12-16: 1 sc in each stitch (36)
Rnd 17: dec. Repeat 18 times (18)
Place safety eyes between rounds 10 and 11.
Take the inc from round 11 as a reference. Place one eye on the second inc of the first group of 3 inc. And the second eye on the second inc of the second group of 3 inc.
Stuff gead with fibersill. Then continue to crochet the body. We will do everything in one piece.
Change color: Chocolate.
Rnd 18: back loop only:
1 sc in each stitch (18)
Rnd 19: 1 sc in each stitch (18)
Change color: yellow.
Rnd 20: back loop only: 2 sc, 1 inc
Repeat 6 times (24)
Rnd 21: 1 sc in each stitch (24)
Change color: chocolate.
Rnd 22: back loop only: 3 sc, 1 inc
Repeat 6 times (30)
Rnd 23: 1 sc in each stitch (30)
Change color: yellow.
Rnd 24:1 sc in each stitch (30)
Rnd 25: 1 sc in each stitc (30)
Stuff head and body with fiberfill.
Change color: brown.
Rnd 26: back loop only: 15 dec (15)
Rnd 27: 1 sc, 1 dec. Repeat 5 times (10)
Rnd 28: 5 dec (5)
Fasten off and hide thread.
Arms x2
Brown cotton yarn.
Rnd 1: 8 sc in Mr (8)
Rnd 2-7: 1 sc in each stitch (8)
Fasten off and leave a long tail for sewing. Stuff the bottom part of the arm with a little bit of fiberfill.
Assembly
- With white cotton yarn, embroider the light mark in the eyes.
- With 3 strand brown yarn, embroider eyebrows 4 rounds above the safety eyes.
- Use fabric marker brush cheeks.
- Sew the nose in the center of the face. stuff it with a little bit of fiberfill.
- Take both threads from the antenna and sew in the upper central part between rounds 2 and 3. Repeat the same with the other antenna.
- Sew arms on each side of the body.
- Sew legs on each side of the body.
- Take a large and a small wing and sew them together with some stitches. Repeat the same with the other two. I recommend watching the tutorial as I explain how to position them correctly. Sew the wings to the central back part of the bee.
So there you have it, a sweet bee amigurumi that is perfect for both beginners and experts alike.
Whether you’re looking to create a cute little bee friend for yourself or as a gift for someone special, this easy-to-follow tutorial will guide you every step of the way. Don’t be afraid to get creative with different yarn colors and accessories to make your sweet bee truly one-of-a-kind. Remember, just like with any new project, practice makes perfect!
So grab your hook and let’s get started on creating some adorable buzzing buddies. Happy crocheting!