Boy, the world of superheroes is a realm I’ve always been fascinated with. And with a hook in hand, I recently tackled The Flash Amigurumi pattern. It’s one of those moments where I thought – “Why didn’t I stitch this up sooner?” Y’know, there’s something electrifying about crafting this iconic figure with yarn.
As I wove The Flash to life, memories zipped back – Saturday morning cartoons, that feeling of wonder, and my childhood dreams of running at the speed of light. Every twist and turn of my hook connected me with a world of heroes and endless possibilities. And, oh, the thrill when that vibrant red suit and iconic lightning bolt started taking shape!
For all you comic buffs out there or parents wanting to bring a little superhero magic into your little one’s world, this pattern is a goldmine. It’s not just a toy, it’s a memento, a symbol of endless possibilities and the spirit of heroism.
Pattern Designer: Ms Tina Crochet
Materials
- Yarn Aislon I65
- Yarn thickness: 1.5 mm
- 3 mm crochet hook
- Tapestry needle
- Pins
- Stitch markers
- Glue
- Safety eyes 4.5 mm
Abbreviations
Mr – magic ring
Ch – chain stitch
Sc – single crochet
Inc – increase
Dec – decrease
BLO – back loops only
FLO – front loops only
Sl st – slip stitch
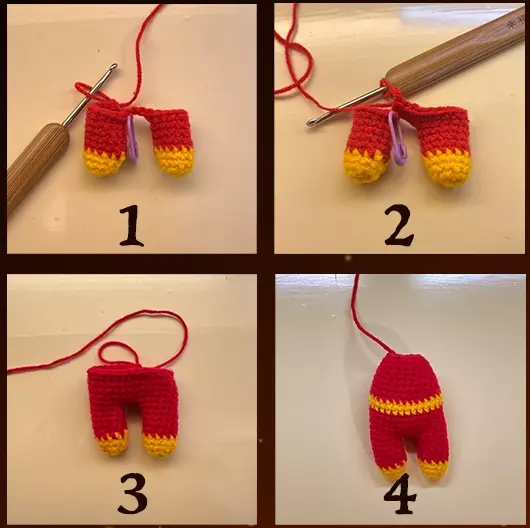
Legs x2
Start with yellow yarn.
Rnd 1: 6 sc in Mr (6)
Rnd 2: 6 inc (12)
Rnd 3-4: 12 sc (2 rounds) (12)
Change to red yarn.
Rnd 5-8: 12 sc (4 rounds) (12)
Making leg A and leg B, next is: leg A: fasten off and hide the yarn tail.
Leg B: you don’t cut the thread, continue to crochet the body.
Body
Rnd 9: ch 3 on leg B, connect leg A, 12 sc on leg A, 3 sc on the chain, 12 sc on leg B, 3 sc on the chain (30)
Rnd 10-15: 30 sc (6 rounds) (30)
Change to yellow yarn.
Rnd 16-17: 30 sc (2 rounds) (30)
Change to red yarn.
Rnd 18: 30 sc (30)
Rnd 19: (3 sc, 1 dec) x 6 (24)
Rnd 20-21: 24 sc (2 rounds) (24)
Rnd 22: (2 sc, 1 dec) x 6 (18)
Fill with stuffing,
Rnd 23-24: 18 sc (2 rounds) (18)
Rnd 25: (1 sc, 1 dec) x 6 (12)
Head
Rnd 1: 6 sc in Mr (6)
Rnd 2: 6 inc (12)
Rnd 3: (1 sc, 1 inc) x 6 (18)
Rnd 4: (1 sc, 1 inc, 1 sc) x 6 (24)
Rnd 5: (3 sc, 1 inc) x 6 (30)
Rnd 6: (2 sc, 1 inc, 2 sc) x 6 (36)
Rnd 7-14: 36 sc (8 rounds) (36)
Rnd 15: (4 sc, 1 dec) x 6 (30)
Rnd 16: (3 sc, 1 dec) x 6 (24)
Fill with stuffing.
Rnd 17: (2 sc, 1 dec) x 6 (18)
Rnd 18: (1 sc, 1 dec) x 6 (12)
Fasten off, and leave a long tail for sewing.
Helmet
Rnd 1: 6 sc in MR (6)
Rnd 2: 6 inc (12)
Rnd 3: (1 sc, 1 inc) x 6 (18)
Rnd 4: (1 sc, 1 inc, 1 sc) x 6 (24)
Rnd 5: (3 sc, 1 inc) x 6 (30)
Rnd 6: (2 sc, 1 inc, 2 sc) x 6 (36)
Rnd 7-11: 36 sc (5 rounds) (36)
Rnd 12: 36 sc, sl st (36)
Rnd 13: 24 sc, sl st (24)
Rnd 14-18: ch 1, turn, 24 sc (5 rounds) (24)
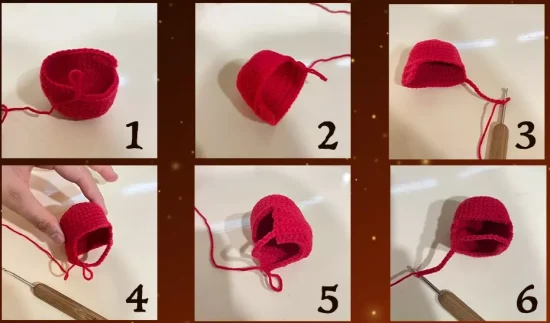
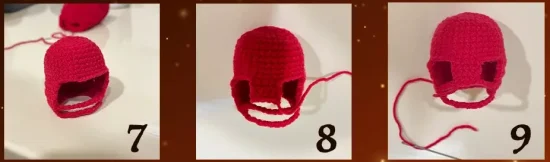
Make ch 12, sl st, and continue to make the edge of the helmet.
Rnd 19: ch 1, 4 sc, 1 dec, 4 sc, 2 dec, 4 sc, 1 dec, 4 sc (20)
Rnd 20: ch 1, turn, 3 sc, 1 dec, 3 sc, 1 dec, 3 sc, 2 dec, 3 sc, 1 dec, 3 sc (16)
Ch 8 and fasten off, close the hole and hide the yarn tail.
Adding part: from the 5th sts of R12
Rnd 1: ch 1, 4 sc (4)
Rnd 2-3: ch 1, 4 sc (2 rounds) (4)
Sewing the part under the helmet.
Hand x 2
Start with red yarn.
Rnd 1: 6 sc in Mr (6)
Rnd 2: 6 inc (12)
Rnd 3-8: 12 sc 96 rounds) (12)
Change to yellow yarn.
Rnd 9-10: 12 sc (2 rounds) (12)
Change to red yarn.
Rnd 11-13: 12 sc (3 rounds) (12)
FIll with cotton fill and fasten off, leave a long tail for attaching latter.
Insert the eyes between R13-R14 with 8 sts.
Put on the helmet.
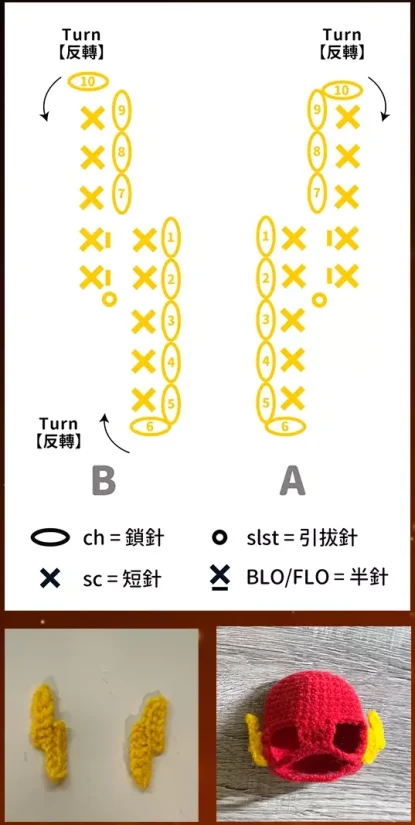
Lighting
Rnd 1: ch 6, 5 sc, ch 4, turn, 3 sc, BLO 2 sc, sl st
Rnd 2: ch 6, turn, 5 sc, ch 4, turn, 3 sc, FLO 2 sc, sl st
Sewing the lighting to the sides of the helmet.
Badges
Rnd 1: 6 sc in MR (6)
Rnd 2: 6 inc (12)
Fasten off, sewing the lighting symbol and paste it.
